Wednesday, September 30, 2009

Butter Murukku for Indian Cooking Challenge

Butter Muruku


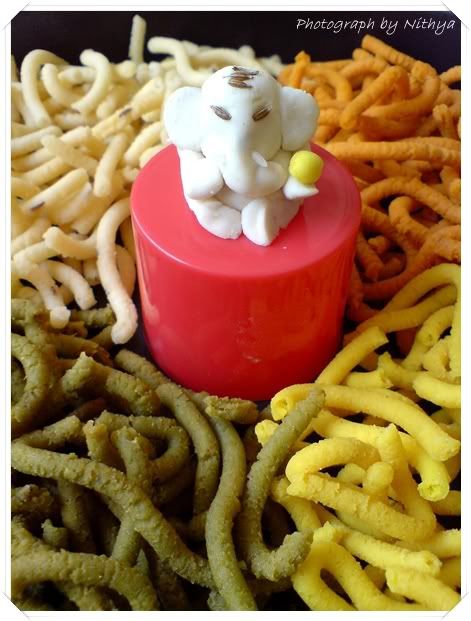
Butter murukku or Jantikalu has been my ever favorite in savories. When this recipe was selected for Indian Cooking Challenge this month, I was pretty relaxed since I had posted it earlier. I dint want to make it all over again since there were loads of savories at home. So here I am reposting the dish for the challenge. :)


White/ Plain Butter Murukku (Jantikalu)

Ingredients:

Rice flour - 5 cups

Urad dhall flour(fry in dry pan and powder it) - 1 cup
Butter - 50 gms
Asafoetida - a pinch
Cumin seeds - 2 tsp
Salt - for taste


Method:

Beat butter nicely in a plate and add all the other ingredients to it and mix well. Partition the mixture into multiple parts. Take one portion of the above mixture and add adequate water to it to make dough. Now put the dough in the muruku maker and squeeze it in the oil and fry till it becomes crisp.

Note: Do not mix the entire mixture into dough at one stretch. Doing that would lead to change of color of the dough when left alone for a long time. So make the mixture into dough by adding water as and when required.


Butter Muruku1

Now to make it more interesting, lets add flavors to the same dough.

Orange Butter murukku

Add little chilly powder and food color orange or red along with the above ingredients and make muruku in the same way. This would give you a gharam flavor and interesting look and feel.

Green Butter Murukku

Grind coriander leaves and some green chillies(accordin
g to your taste) very finely and add this to the above dough and mix well. This would give you the flavor of coriander leaves and would be hot with chillies too.. :)

You can make another variation of using mint leaves too.


Butter Muruku3


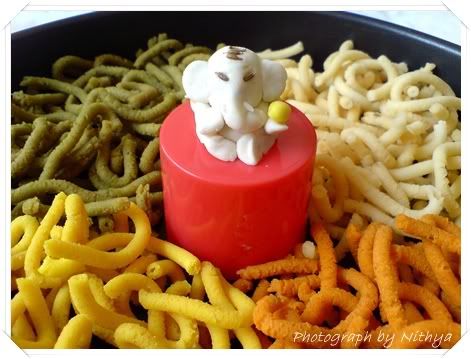
Yellow Butter Murukku


Add a pinch of turmeric power and a little lemon extract to it and mix well. This would give yummy flavor as well as attractive color to it. :)


Butter Muruku2


Along with this post I wanted to make a reminder for our ongoing event - "Garnish the Dish". We are happy to get a lot of entries so far, but we are pretty sure that lot more of you would be interested too. Do take part and make us more thrilled. :) Last date to send entries would be October 6th.

Click on the logo to find more details on the event or visit www.innovativein-laws.blogspot.com.


Written by:
Nithya
post your queries to fourthsensesamayal@gmail.com


Tuesday, September 29, 2009

Ayudha Pooja Celebration :)


Ayudha Pooja special5


Ayudha Puja is an integral part of the Dasara festival, a Hindu festival which is traditionally celebrated in India. In simple terms, it means “Worship of Implements”. The festival falls on the ninth day or Navami of the bright half of Moon's cycle of 15 days in the month of September/October, and is popularly a part of the Dasara or Navaratri or Durga Puja or Golu festival. On the ninth day of the Dasara festival, weapons and tools are worshiped.

The principal goddesses worshiped during the Ayudha puja are Saraswathi(the Goddess of wisdom, arts and literature), Lakshmi (the goddess of wealth) and Parvathi (the divine mother), apart from various types of equipment; it is on this occasion when weapons are worshipped by soldiers and tools are revered by artisans. The Puja is considered a meaningful custom, which focuses specific attention to one’s profession and its related tools and connotes that a divine force is working behind it to perform well and for getting the proper reward.


Ayudha Pooja special1
Top half: Dad's tax book, my music book, kitchen knife, scissors, my color pencils and so on are part of my worship. :)
Bottom half: Veneration of vehicles at home as part of Ayudha Puja!


Ayudha Pooja special4
Celebration does not end at home. The streets are busy selling pooja articles which include color papers to decorate the vehicles, thoranam for home, fruits, puffed rice etc :)


Now coming to my favorite part, the prasadam. :) We made two dishes as offerings for the god.
One being a sweet - Sogusa Boli (Semolina stuffed pancake/Rava boli/Soogi boli) and the other one is Cabbage vada. :)

I am not sure if God liked it, but I just loved it :) :)


Sogusa Boli (Semolina stuffed pancake)


Ayudha Pooja special2

Ingredients:

For the wrapper:
All purpose flour - 1 cup
Salt - a pinch
Cooking soda - a pinch

Cooking oil - 1/2 cup
Water


For filling:

Semolina/rava - 1 cup
Coconut scrappings - 1 1/2 cup
Sugar - 1 1/2 cup
Milk - 1 1/2 cup

Method:

For Wrapper:
Mix all purpose flour, salt and cooking soda together. Add adequate water to roll it into a soft dough. Finally add oil and kneed well to make the dough smooth. Roll the dough into a ball and coat it heavily with oil and leave it alone for 3 hours.

For Filling:
In a heavy bottomed pan, take semolina, coconut scrappings, sugar and milk together. In a medium flame keep stirring it until the semolina gets cooked and the contents roll out without sticking to the sides(Kesari consistancy) . Once done, leave it to cool.

To make boli:
Take a plastic sheet or kitchen foil and grease it with oil. Take a chunk of the wrapper dough, press it out to about 2-3 inches in diameter using your hands. Place a dollop of the semolina filing in the centre and fold it from all sides, proceed to seal at the top. Now press it on all sides with your hand to make a boli of 3 inches wide. Carefully remove it from the sheet and toast it on a pan. Flip and toast on both the sides by applying some ghee over it.

Sogusa Boli is ready to eat :) Serve it hot. Enjoy eating :)


Ayudha Pooja special3


Cabbage Vada


Ayudha Pooja special

Ingredients:

Thoor Dhall - 1 cup
Urad dhall - 1/2 cup
Pepper - 1/2 tsp
Cumin - 1/2 tsp
Green chilly - 2
Ginger - 1/2 inch piece
Cabbage - 100 gms

Salt - for taste


Method:

Soak thoor dhall and urad dhall in water for 2 hours. Grind both the dhalls with pepper, cumin, green chilly, ginger and salt into a coarse mixture by adding very little water. Dice cabbage into fine pieces and add it to the ground mixture.

Now roll them into small balls and deep fry in oil.

Crispy cabbage vada is ready to eat :) You can make it interesting by putting them it in curd or rasam :)


Happy Ayudha pooja to all! :) :) :)

I am sending my Sogusa boli to the festive treats event of Simple Indian Food blog along with Krishnajayanthi Sweet poha and Polala ammavasya Thaligalu paravannam.


Written by: Nithya
post your queries to fourthsensesamayal@gmail.com


Friday, September 25, 2009

International Food Feast - Chinese Gyoza

Chinese Gyoza3


Getting back with a yummy Chinese dish after a small break. :) This is something that was waiting to be made for quite sometime. If you remember I had written a post titled "Food on voyage" few months ago, that was the first ever time I had tasted dumpling, and since then I have been craving for it. Finally today was chosen to be the finest day to try it out :)


Gyoza or potsticker is a Chinese dumpling, and has a history of seven thousand years, widely popular in China and Japan as well as outside of East Asia, particularly in North America. Gyoza typically consist of a vegetable filling/ ground meat wrapped into a thinly rolled piece of dough, which is then sealed by pressing the edges together or by crimping.


Chinese Gyoza2


Gyoza Filling


Ingredients:

Chinese Cabbage - 1/2 cup(chopped)
Onion - 1
Cilantro - 1/4 cup(chopped)
Spring onion - 1/4 cup chopped
Garlic - 5 pods
Ginger - 1/4 inch piece
White pepper - 1 tsp
Oil - for frying
Salt - for taste


Method:

Take 2 tsp of oil in a pan and add finely chopped ginger and garlic and fry for a while.Then add chopped onion and when it turns slightly brown add chopped cabbage, spring onion and cilantro to it. sprinkle little water and adequate salt to it. The vegetables would get cooked in a matter of few min. Finally add white pepper to it and mix well. The filling is done.

You can add carrots and other suitable vegetables to the filling too.


Chinese Gyoza4


Gyoza Wrapper

Ingredients:

All purpose flour - 2 cups
Salt - for taste
Oil
Water


Method:

Mix all the ingredients well to make a smooth dough. kneed for a while to make the dough lump less and elastic. Close the bowl with a cloth and leave it alone for fifteen min.

Now kneed the dough again and pinch small balls from it. Roll out each ball of dough with a rolling pin into circles. Each should be about 2-3 inches across 1/8 inch thick. Roll over again only on the outer most part of the circle to make it slightly thinner than the center, so that once it is crimped it does not become too thick on top. Apply little cooking oil and then keep a little of the filling in the center and close it and crimp the top.

Google for videos on how to fold a dumpling. You would get many styles to follow. ;) Make it look as interesting as possible. :)
This quantity would make upto 30 wrappers. Now steam them for 10 min. Chinese Gyoza Is ready to eat. :) Happy making. :)


Chinese Gyoza5


Serving ideas

* Serve it with white sauce or tomato ketchup.
* Serve it by putting them in a clear soup of any vegetable stalk.
* Serve it with a soy vinegar dipping.


Chinese Gyoza1


White Sauce

Ingredients:

Milk - 1 cup
All purpose flour - 1/2 cup
Butter - 1/4 cup
Salt - for taste


Method:
Take all the ingredients in a heavy bottomed vessel and let it boil for a while. Keep mixing it with a whisk till it becomes creamy and thick. Keep stirring else it would start forming lumps. Cook till the rawness of the flour is gone. White sauce is done. :)


Chinese Gyoza


Thanks to Priya, Priya Raj and Vineela Siva for passing their encouragement as awards to me. :)

Written by: Nithya
post your queries to fourthsensesamayal@gmail.com


Saturday, September 19, 2009

Featured on Hindu - Metro Plus :)


Featured in Hindu1


September 19th of 2009 is going to be one of the happiest days that I can mark in my diary. :)

Little things make us absolutely thrilled about life and so is today. :)

My Mundhiri Appam recipe has been featured in Hindu - Metro Plus weekend edition.

The grandma's recipe column comes up every Saturday. I had send my recipe to them months ago and today I am on cloud nine. :)

Just wanted to share my happiness with you all :)

You can find the e-paper at this link: http://www.hindu.com/mp/2009/09/19/stories/2009091951281100.htm


Featured in Hindu2


Featured in Hindu

Happy mom reading the recipe :)


Friday, September 18, 2009

Internaltional Food Feast - American Toll House Cookies

American Toll house cookies2


Disasters are always common when it comes to cooking. But one such disaster that turned to be the most favorite invention - The Chocolate Chip Cookies. :)

The famous chocolate chip cookies was a accidental invention by Ruth Wakefield who owned the popular restaurant called the Toll house inn at Massachusetts, United States.

Wakefield was an expert in making chocolate cookies and on one fine day when she was running out of baker's chocolate she substituted for it broken pieces of semi-sweet chocolate from Nestle, thinking that it would melt and mix into the batter. It clearly did not, and the chocolate chip cookie was born. Wakefield sold the recipe to Nestle in exchange for a lifetime supply of chocolate chips. :)


American Toll house cookies3


One other note of history says that the head cook of the Toll house inn, Boucher said that the vibrations from a large Hobart electric mixer dislodged bars of Nestle's chocolate stored on the shelf above the mixer so they fell into the sugar cookie dough it was mixing, then broke them up and mixed the pieces into it. He claimed to have overcome Wakefield's impulse to discard the dough as too badly ruined to waste effort baking them, leading to the discovery of the popular combination.

What so ever, I love chocolate chip cookies too much that I praise the accident :)


Ingredients:

All purpose flour - 1 1/2 cup
Sugar - 1 cup
Soda-bicarbonate - 1/2 tsp
Butter - 1/3 cup
Chocolate chips - why measure?? as much as you like ;)
Peanuts(unsalted but roasted) - 50 gms
Eggs - 2


American Toll house cookies4


Method:

Put the eggs and sugar in a bowl and beat till the mixture becomes pale brown.

Sift the flour and soda bicarbonate. Pour over the egg sugar mixture and mix it well.

Add butter, peanuts and chocolate chips to it and stir to mix together.

Scoop out the cookies mixture with a spoon and roll into a ball with your hands and place on greased tray at least 5 cms. apart. Flatten the balls with your hands to make round shape.

Preheat the oven at 200 degree Celsius.

Bake the cookies at 200 degree Celsius for 10-15 min, until lightly browned. (Time subjected to your oven)

Place on wire rack to cool for 5 min.

Chocolate chip cookies is ready to eat. :) Serve it with tea/coffee. :)

Enjoy making and enjoy eating :)


American Toll house cookies1


Written by:
Nithya
post your queries to fourthsensesamayal@gmail.com


Wednesday, September 16, 2009

International Food Feast - English Fruit Cake


Photobucket


International food feast is not going to miss the famous English Fruit Cake. :)

Fruits have always been my friend and so is this cake. Its absolutely yummy and apt for any celebration.

I had made this for my sister's in-laws. The irony is that the sweet couple celebrate their birthdays on the same day but with two years of difference. :)


Wasn't it the best gift?!!! :)


English Fruit Cake3


Ingredients:

All purpose flour - 6 ounce (170 gms)
Sugar - 5 ounce (140 gms)
Butter - 5 ounce (140 gms)
Eggs - 3
Baking powder - 2 tsp
Clove - 4
Cinnamon - 1/2 inch piece
Cardamom - 3
Salt - 1/4 tsp
Tutty fruity -25 gms
Mixed fruits (Cherries, cranberries, raspberry etc..) - 25 gms
Cashews - 10
Raisins - 25 gms
Vanilla essence - 2 tsp
Caramelized Sugar - 2 ounce
(60 gms)


English Fruit Cake1


Method:

Beat butter, sugar and egg yolk together in a bowl.

Sift all purpose flour, salt and baking powder together three times. Dice all the fruits finely and add it to the flour mixture.

Beat egg white separately till it forms foam.

Alternately add a little egg white foam and flour mixture to the butter mixture and mix well.

Powder Cinnamon, cardamom and cloves finely and add it to the mixture along with the vanilla essence.

Now caramelize 2 tbsp of sugar in a dry pan without adding water. When it brows, add some water to it and dilute it. Add this to the cake mixture and mix well.

Preheat the oven to 200 degree Celsius.

Transfer the contents to a well greased cake mold and bake at 200 degree C for 30-45 min.

Yummy English fruit cake is ready to eat :) Have a happy celebration :)


English Fruit Cake2

I had little batter left and these cute little cake lollypops were made with it :)


Photobucket


Written by: Nithya
post your queries to fourthsensesamayal@gmail.com


Monday, September 14, 2009

International Food Feast - Italian Mint Pasta

Broccoli pasta3


The next on International food feast is Italian Spaghetti pasta :) The first dish that comes to my mind when I say Italian is Pasta. I just love it.

Right from childhood, I have been in love with anything that resembles noodles. Now the latest crush is on
Spaghetti pasta. :)

The aroma of mint!
Cheesy texture!
Health quotient of broccoli!
All in the noodle form!

ummmmmmm thats a perfect dinner :)


Ingredients:

Spaghetti pasta - 250 gms
Broccoli - 250 gms
Mint leaves - 1 bunch
Garlic - 5 pods
Jalapeno(Chilly) - 2
Paprika - 1/2 tsp(optional)
Chilly sauce - 1 tsp(optional)
Olive oil - 4 tbsp

Cheddar Cheese
Salt - for taste


Broccoli pasta1


Method:

Cook the pasta in boiling water for 8 min. Drain excess water and keep it aside. Cut broccoli into florets and cook in hot water for 5 min and drain it. Grind mint leaves and chilly finely adding some water and adequate salt to it.

In a pan take three spoons of cooking oil and add the chopped garlic and fry for a while. Then add the ground mint leaves paste to it and fry for few min. Now add the broccoli, cooked pasta, paprika and olive oil to it and saute well. Finally grate cheese over the pasta and serve it hot :)

Happy making. :)


Broccoli pasta2

Now for the awards:

Thanks to Chaitra of Aathidhyam for honoring me with this award for my entry for the rice feast event. :)


Thanks to Kitchen queen for passing me this award. I am honored and happy for your encouragement.


Written by: Nithya
post your queries to fourthsensesamayal@gmail.com

Wednesday, September 9, 2009

International food feast : Mexican Tortilla and Salsa

Mexican tortilla and salsa3


The time has come to try out international food in fourth sense samayal :)

A sudden thought arose to celebrate a week of International food feast in my blog. So viewers the next 7 posts would be my trial of simple versions of various cuisines. :)

The first one is here.


MEXICAN TORTILLA AND SALSA

I made tomato salsa to go with tortilla as well as tortilla chips :)


Salsa
- Pico de gallo


In Mexican cuisine, Salsa pico de gallo is a fresh uncooked condiment made from chopped tomato, onion, chillies etc. It is also called as Salsa picada.


Mexican tortilla and salsa6


Ingredients:

Fresh tomatoes - 3 large
Onions - 2 medium sized
Jalapeno(Chilly) - 1
Cilantro(Coriander leaves)
Red bell pepper - 1/2
Lime juice - 1 tsp
Paprika - 1/2 tsp
Olive oil - 1 tsp
Pepper - 1/2 tsp
Salt - for taste

Method:

Boil 3 cups of water in a vessel. Slightly slit the tomatoes and put them into the boiling water. Let it boil for another 5 min. Switch off the flame and remove the tomatoes from the water and let them cool for a while. Now gently remove the skin and and cut the tomatoes into halves to remove the seeds too. Chop the tomato into small pieces.

Dice onions, bell pepper and jalapeno into small pieces too. Take all the diced vegetables in a bowl and add finely cut cilantro to it. Now add salt, olive oil, paprika, pepper and lemon juice to it and mix well.
Refrigerate for some time to blend flavors.

Tomato salsa is ready to serve. :)
Serve it with tortilla or tortilla chips and enjoy eating :)


Tortilla

Tortilla is a flat bread that is made up of all purpose flour or corn base.


Mexican tortilla and salsa2


Ingredients:

All purpose flour - 2 cups
Baking powder - 2 tsp
Butter or Vegetable shortening - 1/2 cup
Salt - for taste
Hot water - 1 cup

Method:

Mix the flour and salt. Mix in the butter by hand until the mixture resembles small peas. Add the water slowly until you have a soft elastic ball. You may need to add a little more or less water, but do it slowly. You may not really need as much water as you think you do. Knead until smooth. Cover with a damp towel and then let rest 30 minutes.

Make about 7-9 equal size balls. Flatten and roll each ball into a flat round disk. Cook on a very hot cast iron skillet. Apply little oil on it if necessary. Flip when bottom side is golden, the top should be bubbling slightly when ready. Use a spatula to lift the edge and check for doneness before flipping completely. Keep the cooked tortillas warm by covering with a damp towel while you continue to cook.

Tortillas are ready to eat :) Serve it as you like. I have served it by making a pouch and filling it with salsa. :)


Mexican tortilla and salsa1


Tortilla Chips

Tortilla chips is an amazing snack food. They can be made in two ways. Either by deep frying it or by baking. They are extremely crispy and go awesome with salsa.


Mexican tortilla and salsa4


Method:

Make about 7-9 equal size balls from the tortilla dough. Flatten and roll each ball into a flat round disk. Now cut them diagonally 4 times to make 8 triangles. The shape is up to your creativity :)

Baking

Take a gresed baking tray and place the tortilla triangles on them leaving sufficient space between each other. Now apply some oil on the triangles using a brush. Place it in the microwave and bake for 5 min. Flip the triangles and bake for another 5 min. Crispy tortilla chips are ready.

The last pic of the post contains tortilla chips that were baked. :)

Deep frying

In case you decide to deep fry it, do remember to poke the tortilla triangles using a fork to makes tiny holes on it. This will not let the tortilla to puff up much. Now deep fry the tortilla triangles in a hot pan of oil till it turns light brown. Flip and fry for few min. Once done place it on a tissue.

Yummy deep fried tortilla chips are ready to eat. They go super cool with salsa. You can serve it by just sprinkling some paprika on top too :)

The first pic of the post consist of tortilla chips that were deep fried. You can see tiny bubbles in it.

For people who are not too conscious about oily food can surely try this one. :)

Happy making. Enjoy munching international food :)


Mexican tortilla and salsa5


I am sending this to Mexican fiesta 09.

Written by: Nithya
post your queries to fourthsensesamayal@gmail.com

Monday, September 7, 2009

FIRST EVER EVENT :)


Hurray.. I am so excited today. Fourth Sense Samayal is marching towards its next step. Hosting an event was such a dream for me and was waiting for the right time and right way to kick start. :) So here it is..


My first event.... sorry sorry Our first event is here.. :)

Wondering what this OUR means here?????!!!!!

Did you know??????

Nithya(myself) and Pavithra of Dishes from my kitchen are Sister in-laws!!!!!!

Though we are geographically far from each other we have always shared a lot of common interests. So we thought it would be a bang on entry to join hands for conducting events.

So here we introduce our event child blog
http://innovativein-laws.blogspot.com/

Our first event is going to be "Garnish the Dish" an interesting event. Do follow the link above to our blog or just click on the logo to see the details of the event. Eagerly waiting to see all your entries.

Your participation is our strength. We would promise to make it interesting for you always.

Thanks to all the fellow bloggers who gave us the support and strength to move forward to the next step. :)


Popular Posts

Flickr Photostream

www.flickr.com
nits food clicks' items tagged with nitsclicks More of nits food clicks'
Featured on Baking is Hot
my foodgawker gallery
Foodista Drink Blog of the Day Badge