Tuesday, April 27, 2010

Healthy Greens Rice

Photobucket

Healthy diet plans always have green leafy vegetables included in it. Its kind of boring to clean and chop etc.. but then its so healthy and worth all the pains taken. :)

When I was a kid, I used to love Popeye the sailor man cartoon series a lot. :) So every time mom cooks greens, she used to tell me that I would becoming strong like Popeye if I eat it and thats it.. I am done with the greens at ones. :)

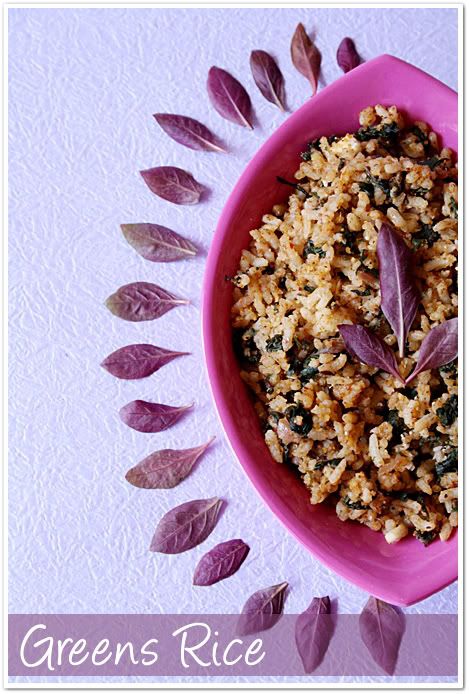
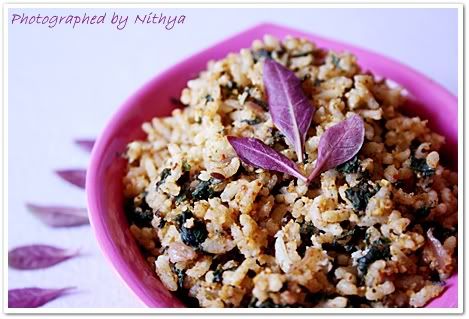
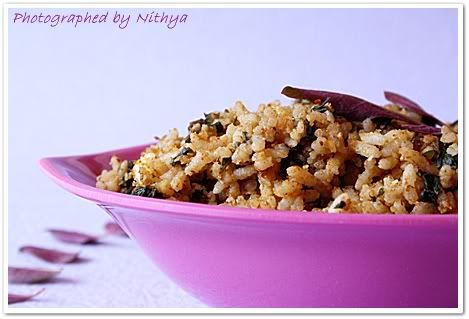
There are various varieties of greens available in the market and this rice can be made with any of them. Its purely your choice and believe me, it tastes yumm :)

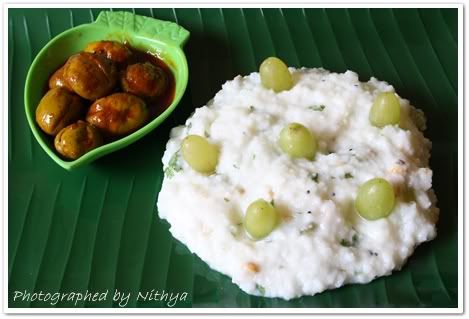
I have used Ponanganni Keerai. The Botanical name of this greens is 'Alternanthera sessilis'. Sanskrit name is Matsyakshi. The common English name is Dwarf copperleaf/ Joyweed/ Sessile joyweed. One side of the greens is purple in color and the other is violet. :)

Photobucket

Ingredients:

Finely chopped Greens - 3 cups(I used ponnanganni keerai. Anyways you can use any greens of your choice)
Rice - 1 cup
Onions - 2
Green chillies - 2
Roasted Peanuts - 1 tbl sp
Lemon - 1 big
Oil - 3 tbl sp

For seasoning:

Mustard Seeds - 1/4 tsp
Cumin seeds - 1/4 tsp
Black gram dhall - 1 tsp
Bengal gram dhall - 1 tsp
Cashewnuts - few

For Masala powder:

Coriander seeds - 1 1/2 tsp
Black gram dhall - 1 tsp
Fenugreek - 1/4 tsp
Bengal gram dhall - 1 tsp
Red Chillies - 5
Asafoetida - a pinch

Photobucket

Method:

Cook rice till each grain separates and allow it to cool completely. Cut onions into small pieces. Clean and chop the greens finely and keep it aside.

Heat oil in a pan and add the seasonings one by one. Now add cut green chillies and diced onions and fry for few minutes. Add the chopped greens and continue frying till it shrinks and the raw flavor goes.

Fry the masala ingredients in half tsp of oil and then powder it finely.

Add cooled rice, salt, powdered spices, peanut powder to the cooked greens and mix well in high till everything blends well.

Finally add grated fresh coconut and squeeze lemon and mix well.

Greens rice is ready to eat. Serve it with curd raitha :)

Happy making. :)

Photobucket

Written by: Nithya
Send in your queries by clicking here.


Tuesday, April 20, 2010

Perfect Chocolate Cake :)

Chocolate Cake3

I am a chocoholic. Terribly obsessed to chocolates and dreams of chocolate always :)

Every time we decide to have a dessert, I would jump up saying chocolate and never does that excitement reduce. :)

So my dream of baking a perfect chocolate cake has come true and here it is for you. :)
Chocolate Cake2

Ingredients:


For Cake:

All purpose flour(Maida) - 1 3/4 cups
Powdered sugar - 2 cups
Cocoa powder - 3/4 cup
Baking powder - 1 1/2 tsp
Baking soda - 1 1/2 tsp
Salt - 1/2 tsp
Eggs - 2
Milk - 1 cup
Cooking Oil - 1/2 cup
Vanilla extract - 2 tsp
Boiling water - 1 cup

Chocolate Cake1
Method:

Stir together all the dry ingredients. Sift them and collect it in a large bowl. Add eggs, milk, oil and vanilla extract and beat on medium speed for 2 mins. Now stir in the boiling water. The batter will definitely be thin.

Preheat the oven to 350°F or 180°C.

Grease and flour two 9-inch baking pans or any desired pan. I used one flower shaped pan and one square pan. Now pour in the prepared batter into the pans and bake in 180°C for 30-35 mins or until wooden pick inserted in center comes out clean.

Cool on wire rack for 15 mins and frost. :)

Note: If you want your cake plain without frosting, increase the sugar level by 1/2 cup or according to taste.

Chocolate Cake
Frosting:

I did a simple frosting on top of the cake by double boiling 100gms of Hershey's milk chocolate with 1/4 cup of butter. The glossy and creamy texture made the cake extra yummy :)


I also decorated the cake with some nutties, chocolate shavings and milky bar chocolates :)

serve it with vanilla ice cream. :) Its sure to be the best dessert anytime :) Impress your guests :)

Happy making. Enjoy eating :)

Chocolate Cake4

Sending this post to Kid's delight - Chocolate feast :)


Written by: Nithya
Send in your queries by clicking here.

Friday, April 16, 2010

Sweet Corn Soup

Sweet Corn Soup

Its a big time pleasure to have a meal starting with a warm soup to a nice cold dessert.

I get absolutely satisfied when I make one such and find my family enjoying it with me as well. :)

Today was one such happy day :)

Sweet corn soup is famous to be a favorite of lots. I am no exception. I just loveeeee sweet corn soup.

Here you go for the simplest recipe to make a very tasty soup.


Sweet Corn Soup1

Ingredients:

Sweet corn - 1
Corn flour - 2 tsp
Soy sauce - 1/4 tsp
Milk - 1/4 cup
Cooked mixed vegetables (optional)
pepper powder - for taste
Sugar - 1 tsp
Salt - for taste

Sweet Corn Soup2

Method:

Pressure cook or microwave the corn kernels till tender. Keep aside some corn kernels for later use. Grind rest of the cooked corn adding some water to it. Cook the ground corn in a pan on medium heat.

Now dilute the the corn flour in 5 tsp of water and add to it. Keep stirring till the corn soup starts thickening. Now add the milk, salt, sugar, soy sauce and the reserved corn kernels and mix well. I added some diced and cooked carrots, potato and beans to the soup to make it extra interesting. Thick and creamy sweet corn soup is ready to serve. :)

Serve it warm topped with some pepper powder. :)

This quantity would suffice 3 servings.

Happy making. :)

Sweet Corn Soup4

Written by: Nithya
Send in your queries by clicking here.

Wednesday, April 14, 2010

Sago Payasam - Celebrating Tamil New Year and Vishu

Colorful payasam5

Happiness is beyond nationality!
Happiness is beyond religion!
Happiness is beyond caste!
Happiness is beyond language!

I am happy to celebrate Tamil new year as well as Vishu this day :) After all you just need a reason to celebrate na!! :) :) :)

I am enjoying this day with a very simple yet versatile dessert. Colorful and fun to have :)

Colorful Payasam 3

Ingredients:

Sago - 1 cup
Water - 3 cups
Sugar - as required
Milk - 1 cup
Cashews - few
Cardamom powder - 1/4 tsp
and some creativity.. he he.. just kidding.. All kinds of squashes and fruit crushes you have :)

Colorful Payasam 2

Method:

Cook 1 cup of sago using three cups of water on stove top. It will take around 15 mins. Once the sago is completely cooked (will become transparent) add sugar and mix till id dissolves.

Now in a pan, take a tsp of ghee and roast the cashews till they turn light brown. Add them to the sago payasam along with powdered cardamom. Add milk to the payasam only before serving.

Your base is done. :)

Now scratch your brain. Find all kinds of squashes, fruit crushes and syrups you have. Make the payasam flavorful :)

White - Plain payasam.

Brown - I added few tsp of chocolate syrup I had. Have you ever imagined a payasam in chocolate flavor. ;) Believe me, its terrific :)

Orange - Mixed few tsp of orange ready made kissan squash I had.

Yellow - Used mango pulp for flavoring.

Green - Combined few drops of pista syrup along with the payasam base.

Pink - Mixed few tsp of Hybiscus squash. :) (will post the recipe soon) You can substitute with rose milk essence.

Isn't that simple yet interesting!! :)

Serve it hot or cold. I prefer my dessert to be cold for this hot climate. :)

Happy making and Happy eating. :)

Colorful Payasam 1

Note:

You can make similar styled dessert using vermicelli or any type of pasta for that matter.

You can use raspberry, strawberry, rose milk, badam essence, blueberry squash etc. Be versatile and freak out.

Enjoy the colors of life. :)

Photobucket

En Iniya Tamil Puthaandu Nalvalthukkal.

Happy Vishu to all :)

Sago payasam participates in Cooking with seeds even hosted by Niloufer of Kitchen Samraj. This event was started by our awesome blogger buddy Priya.


Written by: Nithya
Send in your queries by clicking here.

Monday, April 12, 2010

Sweet Corn Korma

Sweet corn korma5

I am on diet and hence prefer eating rotis in the night than rice or anything else for that matter. But for those rotis to be delicious, I really need interesting kormas or side dishes to go with it. :)

I am literally trying to make side dishes with any vegetable I find at home. :)

Sweet corn is one of my favorite vegetable since its really versatile. I love eating cup corn on the road side stalls ;) Say shopping in pondy bazaar, this is one thing that I will never miss out :)

Today, I was looking out for a nice side dish recipe with corn and luckily found this in Medhaa's blog.

I have made changes according to my taste, hence here we go for the my version of sweet corn korma :)

Sweet corn Korma4

Ingredients:

Sweet corn - 2 cup (Shredded)
Onions - 3 large
Tomatoes - 2
Green chillies - 2
Curd - 1 cup
Chilly powder - 1 tsp
Turmeric powder - a pinch
Garam Masala - 1/2 tsp
Coconut - 1/2 cup
Poppy seeds - 3 tsp
Cashew nuts - 10
Corn flour - 1 tsp
Sugar - 1 tsp
Salt - for taste
Coriander leaves

Sweet corn Korma2

Method:

Grind scrapped coconut, poppy seeds and cashew nuts together into a very smooth paste by adding some water to it. Keep this aside.

Dice onions, tomatoes and green chillies finely. Cook the corn cobs and shred them.

Heat 3 tsp of oil in a pan and add the diced onions, tomatoes and chillies and saute till they turn golden brown. Now add the ground coconut paste and cook till oil separates. Once done, add the sweet corn, turmeric powder, garam masala, chilly powder, sugar and salt. Now add the beaten curd and mix well. Add some water to bring it to the required consistency.

Cover and cook on low flame for 10 minutes.

Dilute the corn flour in 2 tsp of water and add it to the gravy stirring constantly. Now the korma would reach the required creamy consistency. (I did this to get a creamy gravy, you can skip this step if you don't want it that way) Keep stirring for two more mins.

Finally garnish with coriander leaves.

Sweet corn Korma1

Serve it hot with roti, nan, paratha or even ghee rice :)

Happy making and happy eating :)


Sweet corn Korma3


Thursday, April 8, 2010

Raw Mango Pickle / Maavadu

Maavadu1
Raw mango pickle or maavadu is one other irresistible pickle for me. I just can eat it raw. Yummmmm :)

This is a pickle that originated long long ago in south India and is damn famous a combination with curd rice.

Its mango season now and just don't miss to make this delicious pickle at home. :)
Maavadu3
Ingredients:

Raw mangoes - 8 cups
Salt - 1 cup (upto the brim)
Red chillies - 1 cup
Mustard - 4 tsp
Turmeric powder - 2 tsp
Sesame oil - 6 tsp
Water - 2 cups
Sodium Benzoaite - 1/2 tsp

Method:

Wash and dry the mangoes on a cloth. Collect them in a large bowl and add oil, turmeric powder and powdered salt to it and mix well. Keep this aside.

Maavadu
Soak the red chillies in two cups of hot water for 2 hours.

Powder the mustard in a mixie. Now add the soaked red chillies to it and grind into a very smooth paste by adding the same water that it was soaked in.

Add this mustard and chilly paste to the mangoes and mix it well. Keep the pickle in the same vessel for 5 days. Mix the pickle bottom up, once everyday. Initially it will look dry but after 5 days the mangoes will shrink and will give out its flavor.

After 5 days, dilute sodium benzoate in 2 tsp of water and add it to the pickle and mix really well. This is a preservative that is used to keep the pickle from getting spoilt and this also helps in maintaining the crispness of the mango for a long time.

Now transfer it to bottles and store them in the fridge. You can preserve and enjoy this delicious hot pickle for around 6-10 months. :)

Serve it with curd rice or even eat it just like that :)

Happy making :)
Maavadu4
Written by: Nithya
Send in your queries by clicking here.

Monday, April 5, 2010

Masala Mango Pickle / Masala Manga Oorugai

Masala Manga4

Curd rice with Mango pickle is the world's best combination according to me. I can never get this kind of satisfaction of eating a wholesome food by eating anything else. That too when it is home made, nothing else can beat it. :)

Indians and especially South Indians would agree with me I guess. :)


Just like lot others, even I had an inhibition that making pickle is a very cumbersome process and it does not turn out perfect for all and always.


My mom is a super expert in making pickles and especially Masala mango pickle is her specialty. All those who have tasted it could not just stop with one. :) I am an ardent fan of it too. :)

Now its the mango season and I just cant afford to miss the chance.

So this time I took charge and learnt to make this pickle all by myself. :) If a fresher like me can do, why not you???

Masala Manga3

Ingredients:

Small Raw Mangoes - 8 cups
Chilly powder - 1 cup (heaped)
Salt - 1 cup (till the brim)
Turmeric powder - 2 tsp
Asafoetida(Perungayam) - 2 tsp
Fenugreek(Vendhayam) - 6 tsp
Sesame Oil - 1 1/2 cups
Mustard - 2 tsp
Sodium Benzoate - 1 tsp

Masala Manga5

Method:


Wash and dry the raw mangoes on a cloth. Make slits in them in both the directions like shown in the below picture. The slit should go just about 3/4 of the mango, so that the top portion is still stuck together.
Masala Manga
Dry roast fenugreek and asafoetida separately for just few mins and then grind it into a fine powder. Now mix the salt, chilly powder, asafoetida, fenugreek powder and turmeric powder in a bowl and keep it aside.

Now take the oil in a heavy bottomed pan and once it is hot, season with mustard. After it crackles, simmer the stove fully and add mangoes and the mixed masala powder to it. Stir quickly until all the mangoes get mixed with masala. Once done immediately transfer it to a different vessel.

Keep the pickle in the same vessel for 5 days. Mix the pickle from bottom up, once everyday. Initially it will look dry but after 5 days the oil will ooze out and look shiny.

After 5 days, dilute sodium benzoate in 2 tsp of water and add it to the pickle and mix really well. This is a preservative that is used to keep the pickle from getting spoilt and this also helps in maintaining the crispness of the mango for a long time.

Now transfer it to bottles and store them in the fridge. You can preserve and enjoy this delicious hot pickle for around 6-10 months. :)

Note: Once the pickle is transferred to the bottles, see to that there is a layer of oil on top. This will keep the pickle from getting spoilt.

Masala Manga1

Serve it with curd rice. :) I am sure you would say yummmmm after eating the hot and tangy masala mango pickle :)


Happy making :)

Masala Manga2

Coming up next: Maavadu - the ever famous mango pickle ;)

Written by: Nithya
Send in your queries by clicking here.


Popular Posts

Flickr Photostream

www.flickr.com
nits food clicks' items tagged with nitsclicks More of nits food clicks'
Featured on Baking is Hot
my foodgawker gallery
Foodista Drink Blog of the Day Badge