Monday, February 28, 2011

Khandvi

Khandvi2

Ahem Ahem Ahem!!(Cough) has been my language for the past three days. Its so depressing and makes me feel so dull. Above all taking antibiotics makes me feel so drowsy that I wake up so late in the morning.

Waking up late tends to upset the entire day's plan, atleast largely messes up my eating schedules. I have my breakfast late, so become a fussy eater for lunch, which inturn makes me damn hungry in the evening and so on.. ufff too much to handle!!

So today was one such day when I was really hungry in the evening and wanted something spicy cum tangy to treat my tongue which was almost numb with medicines.

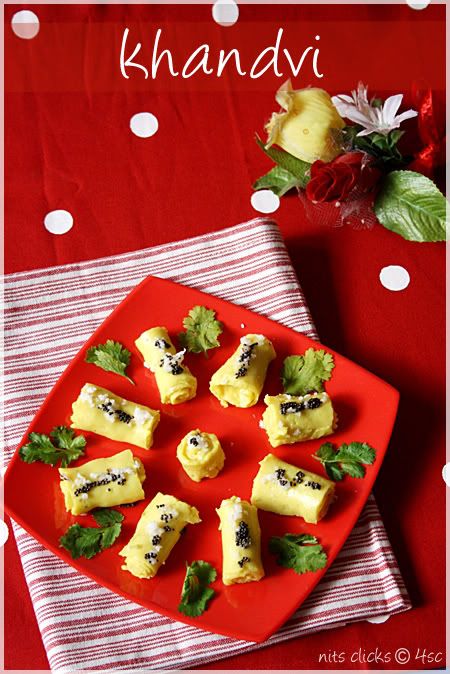
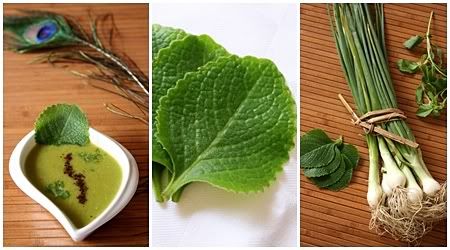
Khandvi has been in my to do list for long and today was the day for it. I had all the energy and josh to do it since it was pretty simple with very few ingredients.

Lata aunty's recipe was quite handy and followed it absolutely except for skipping the sesame tempering.

Khandvi1

Ingredients:

Gram flour(Besan/Kadalai maavu) - 1/3 cup
Curd - 1/3 cup
Water - 1 cup
Ginger - 1/2 inch piece
Green chilly - 1
Turmeric powder - 1/4 tsp
Asafoetida(Hing) - 1/4 tsp
Sugar - 1/2 tsp
Salt - for taste
Oil - 3 tblsp

For tempering:

Mustard seeds - 1 tsp
Grated coconut - 1 tblsp
Coriander leaves

Khandvi

Method:

Sieve the gram flour, salt, asafoetida and turmeric powder together in a bowl.

Grind the ginger and chilly into a smooth paste.

Mix in the above flour mixture, beaten curd, ginger-chilly paste, water and sugar together into a smooth and thin batter. See to it that it does not form any lumps.

Mean while keep your work surface ready by turning over a large plate and grease it well with oil.

Heat oil in a pan and add the prepared batter to it. Keep the flame low and stir continuously until the batter is well cooked. The batter would become slightly thick and glossy once it is cooked and would not stick to the walls of the pan. The batter should still be in pouring consistency and not a mass. Switch off the stove when it reaches that consistency.

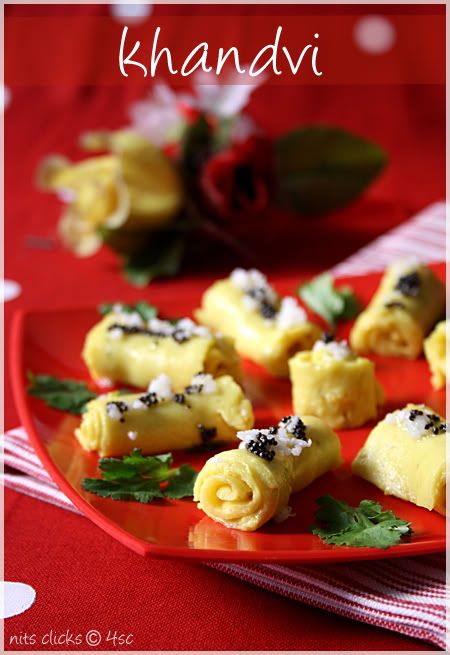
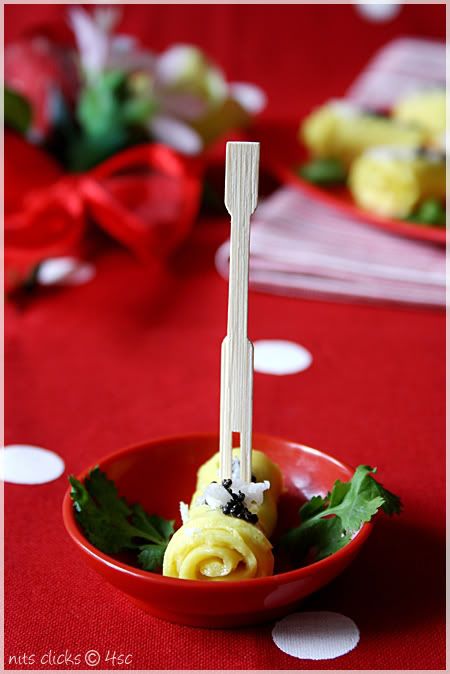
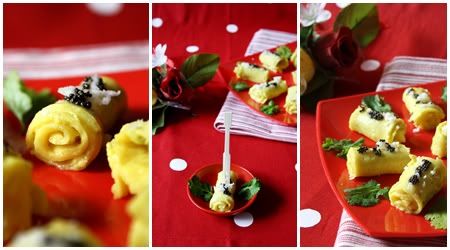
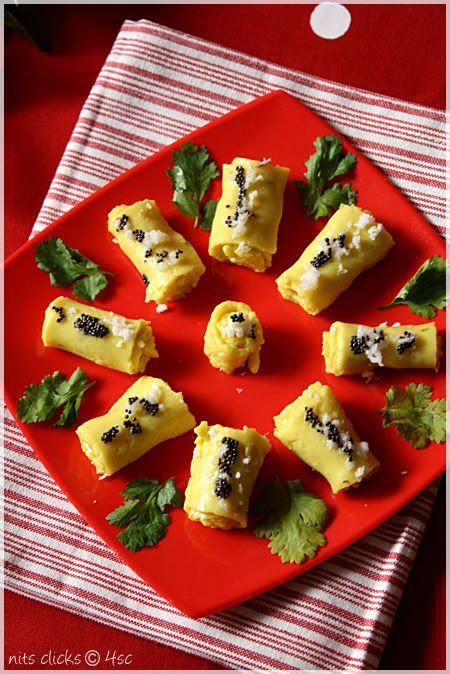
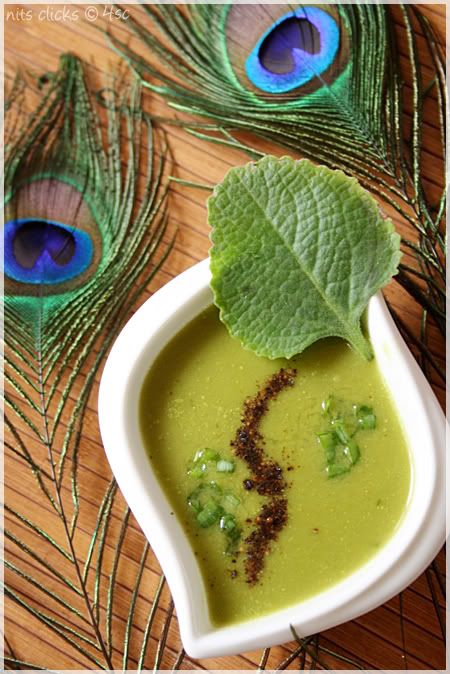
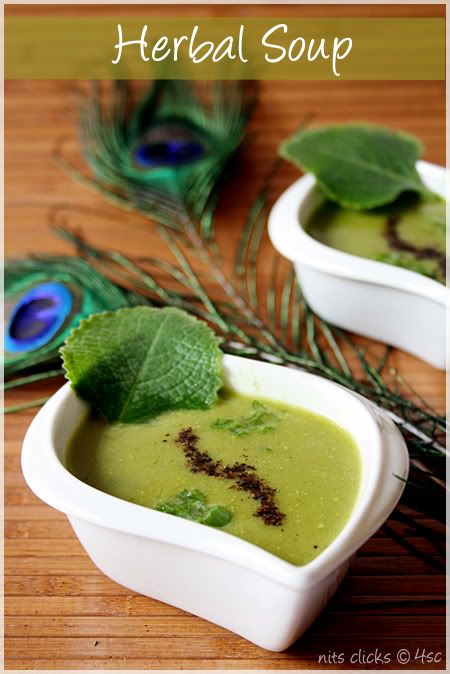
Pour the contents immediately on the greased plate and spread the batter evenly into a thin sheet using a laddle. This has to be done quickly since the batter would thicken when it cools down. Once you have spread it, make even sized stripes using a knife. Allow it to cool for five minutes. Now roll each stripe into spirals and place them on the serving plate.

Crackle mustard seeds in oil and pour them on top of the rolls and garnish with scrapped coconut and finely chopped coriander leaves.

Tangy Khandvi is ready to eat.

This quantity would make 12 spirals.

Happy making :) Enjoy eating :)


Khandvi3

Tips:

Sieving the flour will surely help from the batter forming lumps.

You can avoid adding sugar if you don't like your khandvi being a little sweet.

See to that the batter is in pouring consistency after it is cooked. Over cooking it will result in a mass that will not spread easily.

Allow it to cool for few mins after the lines are drawn, else it would be hard to roll them.

Dont let it cool for long as well. The rolls would tend to break if done so.

You can also add sesame seeds while tempering.

Khandvi4

Written by: Nithya
Send in your queries by clicking here.

Friday, February 25, 2011

Butter Naan with Dum Aloo

Photobucket

All of us at home enjoy dining in restaurants and trying out different cuisines. But what becomes mandatory is to order butter naan with some side dish to accompany it. Without it, my dinner will never be satisfying. It has become a practice lately :)

I always had a thought that making Naan at home is close to impossible since it needs a special fire place where it is usually cooked. I have seen it being done so during my visit to North India. But lately, I have been seeing a lot of people making it at home and their outcome seems to be so tempting that I wanted to give it a try too.

I am really bad or infact working with yeast is a nightmare to me. I'm yet to fish out why the darling yeast is so sensitive and fickle when it has to raise and when it wont. grrrrrr :( it frustrates me sometimes. But inspite of its sensitivity my Naan has always come out well irrespective of how much the dough raises. Thats so sweet of naan for not ditching me :)

And when it comes to accompaniments, baby potatoes is a cute little vegetable that is so versatile and takes in the taste of rich gravy and makes the subzi so special and yummy :)

Dum aloom, though not the authentic way of making it was still so tasty. Its absolutely my way of making it ;)

Loved the potatoes, slight sourness of curd, aroma of kasoori methi and rich cream of almonds :)

Photobucket

Dum Aloo Recipe

Ingredients:

Baby potatoes - 1/4 kg
Almonds - 5
Onion - 2
Tomato - 2
Curd - 1 cup
Ginger - 2" piece
Garlic - 5 pods
Dry red chillies - 4

Cloves - 3
Cardamom - 2
Cinnamon - 1" stick
Cumin seeds - 1 tsp
Turmeric powder - 1/2 tsp
Garam masala - 1 tsp
Kasoori methi - 1 tsp
Sugar - 1 tsp
Coriander leaves
Salt - for taste
Oil - for frying

Photobucket

Method:

Pressure cook the potatoes. See to that you don't over cook it. Peel the potatoes and pierce holes with a fork.

Take 2 tblsp of oil in a pan and shallow fry the potatoes until they turn crispy and golden brown on all sides. Keep them aside.

Blanch the almonds in hot water for ten mins and peel off the skin. Grind it into smooth paste along with ginger, garlic, red chillies and tomatoes.

Chop onions into thin slices.

Heat two tsp of oil in a pan and add cumin. After it splutters, add cardamom, cinnamon and cloves. Fry for just a min and then add the chopped onions and fry till they turn transparent.

Now add the above ground paste and fry till the raw smell disappears. Now add the turmeric powder, garam masala powder, kasoori methi, sugar and salt. Mix well and now drop the shallow fried potatoes into the gravy. Simmer the stove and slowly add the beaten curd stirring continuously. Keep the flame in medium and cook closed for five mins.

Finally garnish with cut coriander leaves.

Hot dum aloo is ready to eat. Serve with butter nan or any Indian bread. :)

Photobucket

Butter Nan Recipe

Ingredients:

All purpose flour(Maida) - 3 cups
Warm water - 3/4 cup
Yeast - 3/4 tbl spn
Sugar - 2 tsp
Salt - for tasye
Olive oil - 1 tbsp


Photobucket

Method:

Drop the yeast, salt and sugar in warm water and beat until everything dissolves.

Add the sifted maida to the above ingredients and kneed well until you get a smooth dough.

Finally add olive oil and kneed for a while till the dough springs back when you press with your finger.

Leave the dough in a greased bowl and cover it with cling film or wet cloth. Allow it untouched for an hour. The dough will double in size by then.

At this stage, I would like to tell you that its absolutely ok if the dough does not raise much. It really doesn't affect the texture of the naan. My dough dint raise much but the naan was really soft and tasty.

Now knock down the air in the dough and kneed again for few mins. Divide the dough into equal sized balls.

Lightly flour the surface and roll out each ball until you have a circle of 1/2 "thickness. Gently pull on one edge of the circle to form the Naan into a teardrop shape. Do not pull too hard or you may tear the Naan.

Apply water on top of the naan and place it on the skillet wet side facing down. This will make the naan stick to the skillet. Cook closed for a min. You will find bubbles on the nan when you open it.

Immediately turn the skillet and roast the naan directly on flame. Since the naan is sticking to the base it will not be hard for you to do it. Once you get brown spots on the naan, turn the pan and transfer the naan to your serving plate. Apply butter generously when the naan is hot.

Serve it with hot dum aloo :)

Happy making and enjoy eating :)

Photobucket

Written by: Nithya
Send in your queries by clicking here.

Friday, February 18, 2011

Granola Bars

Photobucket

The only energy bar that I had tasted long back were our own Horlics bars which are majorly made of puffed rice and some nuts. It never impressed me and I really never wanted to have them again.

But lately, I have been seeing a lot of granola bar recipes around in the blogosphere that I got a little too tempted to try it out. Gave it a try last day and fell in love with it. Yummy and filling :)

These can be had as breakfast bars or simply for your 4 o'clock hunger calls. :)

Photobucket

Ingredients:

Oats - 1 cup
Corn flakes - 1/2 cup
Puffed rice - 1/4 cup
Chopped almonds - 1 tblsp
Chopped Walnuts - 1 tblsp
Raisins - 1 tblsp
Chocolate chips - 1 tblsp
Honey - 1/2 cup
Brown sugar(demerara) - 1/4 cup
Melted butter/vegetable oil - 2 tblsp

Photobucket

Method:

Toss oats, corn flakes, puffed rice, chopped almonds and walnuts on low flame for ten mins till they become crisp.

Allow it to cool down for a while.

Photobucket

Take butter, honey and sugar in a sauce pan and mix it on a medium flame until the sugar melts completely and begins to bubble. Switch off the stove when the syrup turns slightly thick.

Immediately add the tossed oats and other ingredients except chocolate chips and mix well until it is completely coated with the syrup.

Spread it evenly on a butter paper. Now add the chocolate chips and press them lightly and cover it with another sheet of butter paper. Press down gently with a rolling pin to make a smooth top. Once you have pressed it down enough to make half an inch thickness, remove the butter paper placed on top and allow it to cool for just a while. Once it comes to room temperature, cut them into bars.

Granola bars are ready to eat, enjoy with your cup of milk :)

This quantity would yield 10 to 12 bars.

Store it in an airtight container.

Photobucket

Note:

You can use white sugar instead of brown.

If your sugar starts to caramelize while making the syrup, simply add few tsps of water to it and then continue stirring.

The bars might be soft initially, but it would turn slightly crispy after it cools down.

Photobucket

Tips:

You can use dry fruits of your choice.

Add pistachios, dates, groundnuts etc to make it rich and yummy.

Photobucket

Written by: Nithya
Send in your queries by clicking here.

Wednesday, February 16, 2011

Eggless Instant Microwave Cake

Photobucket

This post is super hot :) Just tried this cake a while back and could not resist posting it immediately.

I wasn't in good mood this morning. Have been dead dull and inducing my mood to rest at home too. Sometimes life isnt as happy as the fairy tales! :( Grrrr nothing happens as we expect and I hate bad surprises.

But all I could do to divert myself was to make a cup of cake for myself!! yup "Cup of cake" :) A perfect cup of instant happiness :) yummmmm I'm back to good mood again :)

Someone sometime said the word "STRESSED" when reversed makes "DESSERTS" :) warewah!! how true :)

This is can also be called a bachelor's cake. Its so simple and mess free that a novice bachelor can also make. :)

I picked this recipe from the blog "Life and spice" and it came out really well. :)

The cake was perfectly baked, chocolaty, soft and yummy :)

Photobucket

Ingredients:

All purpose flour(Maida) - 3 tblsp
Powdered Sugar - 3 tblsp
Cooking oil - 3 tblsp
Milk - 3 tblsp
Cocoa powder - 2 tblsp
Chocolate chips - 2 tsp(Optional)
Vanilla essence - 1/4 tsp
Cooking soda - 1/4 tsp
Salt - a pinch

Photobucket

Method:

In a microwave safe coffee mug, mix together all purpose flour, sugar, cocoa powder, cooking soda and salt.

Add oil, vanilla essence and milk to it and stir well with a spoon until it becomes a smooth batter. See to that it does not form any lumps. Finally add the chocolate chips and give it one stir.

Microwave this at 900W(max power in my microwave) for 2 mins. Check it out after 1.5 mins and if the cake looks still wet go ahead with another 30 seconds. The timing is subjected to your microwave settings.

The cake would initially look puffed up but would drop down once cooled.


Instant microwave cake is ready :)

Serve it warm with some vanilla ice cream. It tastes awesome as it is :)

Photobucket

Tips:

This cake is baked in the microwave mode and not in convection mode of the microwave.

Make sure if your coffee mug has "microwave safe symbol" at the bottom of your coffee mug.

To make vanilla cake you can skip cocoa and increase the cooking soda by a pinch. This is because cocoa by itself has raising agents. Hence skipping it will require some more of cooking soda for the cake to raise.

See to that the batter occupies just half of your coffee mug.

You can top the cake with some fresh cream or butter cream.

You can also add a tsp of instant coffee powder to make coffee flavored cake :)

Photobucket

Written by: Nithya
Send in your queries by clicking here.

Monday, February 14, 2011

Valentine's Day - Eggless Donuts / Doughnuts

Photobucket

Wish you all a very happy Valentine's Day :)

Yup!! I totally agree to the point that Valentine's day is a little over rated, but how does it bother for people like me who just want a reason to celebrate and make special dishes! ;)

Ofcourse I can also hear buddies who know me well, whispering "Why is this little spinster celebrating??" Love is an universal feeling and it can be the love for my family as well ;) awwww now thats sounding too senti. Let me stop beating around the bush and make it simple. I am dedicating this post to all the love in the world. :)

Let me also dedicate it to the yet to come "invisible man" of my life :P

Photobucket

Doughnuts or donuts are one of the best fried snack I love to munch on. Infact I dint even know it was a fried for long. I can totally forgo my guilt for such incredibly yummy doughnuts. :)

I had to go egg-less since I wanted the couple at home(mom and dad) to enjoy it as well :)

The fresh yeast that I got to make these worked so well that my doughnuts were so soft and lite. I am sure I can eat at least three on a go ;)

Aren't they irresistible???!!!

Photobucket

Ingredients:

All purpose flour(Maida) - 1 1/4 cup
Fresh yeast - 2 tsp
Milk - 1/4 cup
Water - 1/4 cup
Butter - 1 tbsp
Powdered Sugar - 3 tbsp
Salt - a pinch
Vanilla essence - 1/2 tsp
Glaze

Photobucket

Method:

Warm the water and add the yeast and a tsp of sugar to it. Leave it untouched for ten mins. Then mix well till the yeast dissolves.

Combine the flour, powdered sugar, salt, vanilla essence, milk and the yeast mixture together and knead into a soft dough.

Bring the butter to room temperature and mix it to the dough and knead again till the dough is smooth and elastic.

Place the dough in a bowl and cover with cling film. Leave it untouched until it doubles. It would take around 20-40 mins.

Photobucket

Press the dough lightly to remove air and knead softly. Now roll out the dough to 1/4" thickness on a well floured surface. Use cutter and cut out the desired shape and leave them on floured butter paper for another ten mins until it doubles again.

Heat oil in a pan. Carefully lift the dough rings and fry them in hot oil on medium flame till golden brown in color.

Donuts are ready :)

Photobucket

Cinnamon sugar glaze:

Powder cinnamon and mix it with some caster sugar. Spread this on a plate and dip the doughnut in it until it gets coated with sugar on all the sides.

Photobucket

Sugar icing:

Take few tsps of icing sugar in a bowl and add desired food color to it. Add just a few drops of water to it and mix well till it forms a paste. Fill this in a paper cone and draw desired designs on the doughnut or simply drizzle it over the doughnut.

Photobucket

Chocolate glaze:

Ingredients:

Powdered sugar - 1 cup
Cocoa powder - 4 tblsp
Milk - 5 tsp
Vanilla essence - 1/2 tsp

Method:

Mix all the ingredients in a bowl and see to that it doesn't form lumps. The tickness of the glaze is upto you. You can adjust the quantity of milk to make it thick.

Dip the doughnuts in the glaze and allow it to set for 10 mins.

Photobucket

I'm happy to sent this as an entry to "The best western desserts" event conducted by Priya of
Now serving.

I'm also sending this to "Food palette series" - Brown.


Written by: Nithya
Send in your queries by clicking here.

Wednesday, February 9, 2011

Palak Kofta Curry

Palak kofta4

Mom used to tell me that she never had trouble making me eat greens when I was a kid. That taste for greens has not changed for me and I still love eating them. Be it in curry form or soup or anything for that matter.

Now that I have grown up to cook my own meal, greens has been one of the most versatile veggie to try various dishes.

My latest trial was the kofta curry which turned out to be super delicious. The koftas were soft and went really well with the gravy enhancing it on the whole :)

Palak kofta3

Ingredients (for kofta):

Potatoes - 2
Bread slices - 4
Onion - 1
Green chillies - 2
Garam masala powder - 1/2 tsp
Mango powder - a pinch
Coriander leaves(Finely chopped) - 2 tblsp
Salt - for taste
Oil - for deep frying


Palak kofta5

Method (for kofta):

Pressure cook the potatoes. Peel and mash them thoroughly. Chop the onion, chillies and coriander finely.

Dip the bread in water, squeeze and mix it along with mashed potatoes, chopped onions, chillies, coriander leaves, garam masala, mango powder and salt. Mix well and pinch out a little and roll it into balls. Deep fry the balls in hot oil. Keep the flame low and fry for few mins till they turn into golden brown color.

Place them on kitchen tissues to remove excess oil.

Palak kofta2

Ingredients (for gravy):

Spinach(Palak) - 2 bunches
Milk - 1 cup
Onions - 2
Ginger - 1 inch piece
Chilly powder - for taste
Turmeric powder - a pinch
Dry mango powder(aamchur) - 1/2 tsp
Garam masala powder - 1/2 tsp
Salt - for taste
Butter - 2 tsp

Palak kofta1

Method (for gravy):

Wash and chop palak finely. Heat a tsp of oil in a pan and fry the palak by adding little sugar to it. This will help maintain the color of palak. Sprinkle water if necessary. Close the pan with a lid and cook for few mins. Once it becomes soft, switch off the stove and allow it to cool.

Grind the palak into a smooth paste.

Chop onions and mince ginger finely.

Heat butter in a pan and fry chopped onions and ginger till the onions turn golden brown. Now add the ground palak, salt, chilly powder, mango powder, garam masala and turmeric powder to it. Let the contents boil for a while. Simmer the stove and add the milk slowly stirring it continuously. Now let it boil till it becomes thick and creamy.

Add the above done koftas just before serving the curry.

Yummy and healthy palak kofta curry is ready to eat.

Serve hot with chapathi, roti or ghee rice :)

Palak kofta

Tips:

You can add finely chopped palak to the kofta dough also, before making koftas.

Top the curry with roughly chopped onion for some crunchiness.

You can serve the extra koftas dunked in butter milk ;)


Written by: Nithya
Send in your queries by clicking here.


Monday, February 7, 2011

Herbal Soup

Photobucket

Chennai weather is still pleasant and infact kind of cold in the evenings and this kind of climate always demands for something hot and spicy. When I was craving for something of that kind last day, I quickly formulated this simply herbal soup which was just too soothing and yummy :)

Having oregano and tulsi in my garden is a boon. It comes handy to treat me when I'm down with cold. Making a soup with them is just too healthy. Not just for its medicinal value but it adds a punch to the soup as well :)

Photobucket

Ingredients:

Spring onion(Scallion/Vengaya thal) - 1 bunch
Oregano(karpooravalli) - 5 leaves
Tulsi(holy basil) - 10 leaves
Milk - 1/2 cup
Vegetable stock - 4 cups
Corn flour - 2 tblsp
Sugar - 1 tsp
Salt - for taste
Pepper - for taste

Photobucket

Method:

Dice spring onion bulbs roughly. Chop the oregano, tulsi and spring onions into small pieces(Reserve some for garnish)

Take a tsp of butter in a pan and fry the spring onion bulbs until golden brown. Now add the chopped herbs and fry for a min. Add half a cup of vegetable stock and cook the herbs by closing the pan with a lid.

Once the herbs are cooked, allow it to cool for a while. Then grind the it into a smooth paste.

Take the ground paste in a vessel and add the remaining vegetable stock, salt and sugar to it and allow it to boil. Simmer the stove, mix corn flour in half cup of milk and add it to the soup. Let it boil for few more mins.

Sprinkle pepper and the reserved herbs before serving. Enjoy a hot cup of herbal soup :)

Happy making :)

Photobucket

Tips:

You can replace spring onions with any greens of your choice.

The herbs are slightly spicy, so taste test it before you add pepper.

Skip the milk to have a lighter soup.

Add cream instead of milk if you wish for a rich soup.

Photobucket

Written by: Nithya
Send in your queries by clicking here.

Popular Posts

Flickr Photostream

www.flickr.com
nits food clicks' items tagged with nitsclicks More of nits food clicks'
Featured on Baking is Hot
my foodgawker gallery
Foodista Drink Blog of the Day Badge