Thursday, June 21, 2012

Onion Murukku

Photobucket

Murukku is one of the most interesting and delicious Indian snack item. My mom makes crispy crunchy and flavorful murukku for our 4 pm grumbles.

Today fortunately it rained(errr drizzled slightly) sometime back in Chennai and it was fantastic to enjoy this murukku during tea time. The after taste of onion that it leaves in your tongue will make you say no to anything else including a glass of water just to enjoy the flavor for a while more. :)

Photobucket

Ingredients:

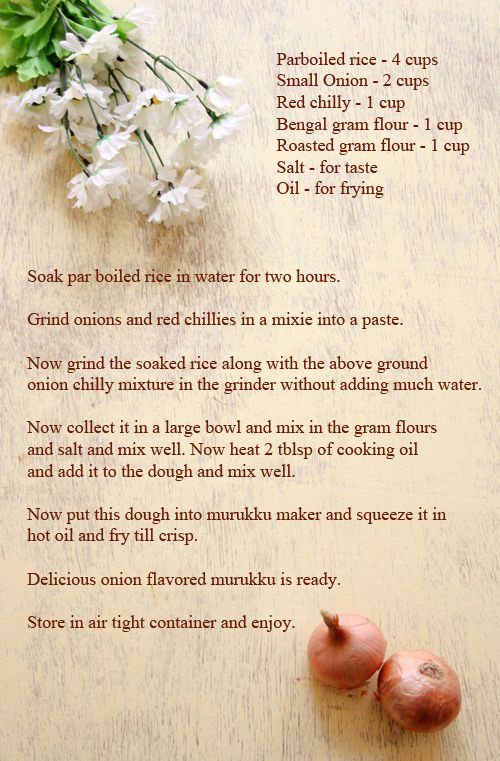
Parboiled rice - 4 cups
Small Onion - 2 cups
Red chilly - 1 cup
Bengal gram flour - 1 cup
Roasted gram flour - 1 cup
Salt - for taste
Oil - for frying

Photobucket

Method:

Soak par boiled rice in water for two hours.

Grind onions and red chillies in a mixie into a paste.

Now grind the soaked rice along with the above ground onion chilly mixture in the grinder without adding much water.

Now collect it in a large bowl and mix in the gram flours and salt and mix well. Now heat 2 tblsp of cooking oil and add it to the dough and mix well.

Now put this dough into murukku maker and squeeze it in hot oil and fry till crisp.

Delicious onion flavored murukku is ready.

Store in air tight container. This quantity would be sufficient to make 2kgs of murukku.

Photobucket

Tips:

Just in case you dont have small onions at home, just use chopped big onions to make the murukku.

Photobucket

Written by: Nithya
Send in your queries by clicking here.

Tuesday, June 19, 2012

Home Made Instant Poha Mix - For bachelors & trips

Photobucket

Are you a novice cook?? A bachelor?? or a safe traveler who would love to carry your own food?? Are you going to leave your helpless husband back home??

Then scream in joy.. Here is one best choice for you to make. Yup Eureka!! I tried and found the formula today :P

Its so simple and delicious too. Hardly takes 10 mins to make the mix and 2 mins to cook the poha when you are hungry!!

Its for sure a boon!!! Make and enjoy :)

Photobucket

Ingredients:

Poha (flattened rice) - 1 cup
Asafoetida - 1/4 tsp
Turmeric powder - 1 tsp
Salt - for taste
Red chillies - 4
Channa dhall - 1 tsp
Urad dhall - 1 tsp
Curry leaves
Mustard seeds - 1/2 tsp

Photobucket

Method:

Take a pan and add 1 tsp of oil, splutter mustard seeds and follow it by urad dhall, channa dhall, red chillies and curry leaves. Once the dhall turns light brown simmer the stove and add the poha and fry for just two mins in low flame.

Remove from flame and allow it to cool down. Store in a air tight box in a cool and dry place.

Instant poha mix is ready.

You can store this in the shelf for 2 weeks. It will keep well until 2 months if you store in refrigerator.

Photobucket

How to make poha with instant mix:


Take the instant mix in a bowl and pour just enough water to cover it. Allow this to get soaked for 15 - 25 mins.

Option 1 - Stove top:

Now take a pan and add 1 tsp of oil and drop in the soaked poha mix and stir for two mins in medium heat.

Serve hot with mango pickle.

Option 2 - Microwave:

Transfer the soaked poha mix to a microwave safe bowl and heat it for two mins stirring once in between.

Serve hot.

Option 3 - Hot water:

Soak the instant mix in hot water instead of soaking in room temperature water for 10 mins and serve immediately.

For extra punch you can chop an onion finely and fry it before you fry the soaked poha mix :)

Photobucket

Written by: Nithya
Send in your queries by clicking here.

Thursday, June 14, 2012

Eggless Cinnamon Rolls

Photobucket

The smell of cinnamon while baking is the best of all the aromas I have ever experienced and loved. :) Most of you would agree to me!

The spice is so delicious when added to both savory and sweet dishes. Its such a versatile spice which I fell is not very well used here in India.

I have fond memories of eating cinnamon rolls from mcrennett. They make a large roll which can be sliced into veges and served. Their rolls had the cashew flavor and I wanted to have it in mine too :) Dad used to get us the cinnamon roll and veg puffs for snacking and I have just loved it so much that the moment I recollect it, I'm able to bring back the taste in my tonge :) yummy :)

Photobucket

Ingredients:

All purpose flour (Maida) - 1/2 kg (2 1/2 Cups)
Sugar - 50 gms
Salt - 1 tsp
Yeast - 15 gms
Water
Butter - 2 tblsp

Cinnamon powder - 2 tblsp
Cashews - 10
Sugar - 1/2 cup
Butter - 2 tsp

Photobucket

Method:

Clean your work surface ( Kitchen slab is good enough).

Sieve the all purpose flour on the work surface and make a well in the center.

Tip in the yeast, sugar and salt in the center. Add 1/2 cup of lukewarm water on top of the yeast and rub with your fingers until the yeast, salt and sugar dissolve in the water. Now gently push in the all purpose flour and kneed well. Add more of lukewarm water and kneed until everything comes together into a sticky dough.

Now pour the melted butter on the dough and kneed well incorporating air into the dough. This is simply done by stretching the dough to a feet long and folding it into half, incorporating air in the center. Keep doing this by rotating the dough in both the directions. You need to kneed the dough for 15 mins in this method for best results.

Grease a large bowl with butter and place the dough in it. Wrap with cling film and keep it in a warm place for one hour or until it doubles in quantity.

Photobucket

Once it doubles, knock the air out and roll it into a 1/4 inch large rectangle with the longer side facing you.

Apply butter lightly on top of the rolled dough and sprinkle sugar, coarsely ground cashew powder and cinnamon powder evenly over it and roll it into a long spiral bread.

Slice them into 2 inch pieces and place them in a greased baking pan. Once again allow it to raise for 1/2 an hour.

Meanwhile preheat the oven to 180°C.

Bake the rolls for 20 - 25 mins. Until it is well puffed up and light brown on top.

Enjoy the delicious cinnamon rolls :)

Photobucket

Written by: Nithya
Send in your queries by clicking here.

Tuesday, June 12, 2012

Cornflakes Cookies

Photobucket

Crispy!!! Crunchy!! Melt in the mouth!! Delicious!! Rustic!! Irresistible!! Yummy!! are just some of the comments I have got from people when I have made these cookies at home :) I feel so blissful when I get such comments from them :) Cant ask for anything else in return.

These cookies are easy to make and taste simply delicious. Since its a loose dough cookies that spreads well, it will yield a lot in terms of quantity too :)

Yup thats a lot of butter, but you can skip some oil and cream for the next couple of days and indulge in these :P Your tongue needs to be treated royally at times too!!

My funda is to bake with enough(Lots) of butter but eat less quantity. Don't compromise on taste to eat more. Two delicious cookies a day would do to satisfy your cravings. :) What do you say????

Photobucket

Ingredients:

Butter – 1 cup (200 gms)
Sugar – ¾ cup
Water – 3 tbl sp
Vanilla essence – 1 tsp
All purpose flour – 250 gms
Baking powder – ½ tsp
Cornflakes – 1 cup

Photobucket

Method:

Sieve all purpose flour and baking powder together twice and keep it aside.

Beat butter and sugar in a bowl until light and fluffy. Add essence and beat. Pour in 1 tbl spn of water at a time and beat until incorporated.

Now add the sieved flour and baking powder mixture in three parts and beat in slow speed until it forms into soft dough.

Now cover the bowl with cling film and keep in the fridge for 15 mins.

Photobucket

Meanwhile preheat the oven to 180 c.

Crush the corn flakes in a blender or just with hands into small bits and take in a wide plate or bowl.

Remove the dough from fridge. Wet your hands and pinch small portions of the dough and drop it on the corn flakes and roll until it is well coated. Flatten it using your palms and place on baking tray leaving 1 inch space between the cookies.

Bake for 12 to 15 mins on 180 c.

Photobucket

Tips:

You can use bread crumbs instead of crushed cornflakes and call it bread crumb cookies too :P

It might be a little soft when the cookies are out of the oven, but it will become crispy and melt in the mouth kind once it cools down.

Photobucket

Written by: Nithya
Send in your queries by clicking here.

Friday, June 8, 2012

Snickers Shake

Photobucket

The summer is dehydrating us and we really need some interesting and yummy drinks to rejuvenate us. While I was fishing my fridge to blend something up, I simply came up with this drink by throwing in all what I like into the blender.

Pamper yourself with this simple drink for the coming the coming weekend :)

Photobucket

Ingredients:

Snickers chocolate - 1 bar
Milk - 1 cup
Sugar - 2 tsp
Cocoa powder - 2 tsp
Chocolate chips

Photobucket

Method:

Chop the snickers bar into small chunks.

Blend milk, snickers, cocoa powder and sugar together.

Add some ice cubes and top the shake with chocolate chips :)

Simple and delicious drink is ready :)

Photobucket

Written by: Nithya
Send in your queries by clicking here.

Tuesday, June 5, 2012

Citrus Popsicles

Photobucket

Popsicles bring back my childhood memories. The colored ice bars that we have licked and enjoyed are so memorable isn't it??

There are other forms of popsicles that are filled in a long plastic cover pipes, locally called us 'pepsi'. I just cant forget those delicious ice which we considered as the best dessert and enjoyed so much :) I even remember myself sticking my tongue out in order to scare people after having grape ice :) I am sure most of you would be able to recollect your good old days too!!!

There is no law that states grown ups shouldn't enjoy these small delicacies again. Get back to childhood for few mins and enjoy it, just like how I did :) And of course share the fun with your kids too :)

Photobucket

Ingredients:

Grape juice - 1 cup
Tonovin essence (grape essence) - 2 drops
Lemon juice - 1/4 cup
Lemon zest - a pinch
Water - 3/4 cup
Yellow food color - a pinch
Sugar syrup - 1 cup

Popsicle mould
Pop sticks - 6

Photobucket

Method:

To make sugar syrup -

Sugar - 1 cup
Water - 1 cup

Take sugar and water in a pan and allow it to boil on simmer until sugar melts completely and starts to bubble. The syrup just has to turn sticky. Remove from heat and allow it to cool down.

Photobucket

To make Popsicle -

Take 1 cup of grape juice and add 1/2 cup of sugar syrup and two drops of tonovin essence. Mix well and fill in the popsicle mould until half its height. Set it in the freezer for two hours.

Take 1/4 cup of lemon juice and add 1/2 cup of sugar syrup, 3/4 cup of water, lemon zest and yellow food color and mix well.

Remove the popsicle mould from the freezer after the base layer is set and now pour the lemon juice over it slowly.

Screw the pop sticks slowly into the center and set it in the freezer again for a minimum of two hours.

urrrrr usssssss slurp!!! Enjoy the popsicles :)


Photobucket

Tips:

Wash the mould before you fill in the juice. This will help while demoulding the popsicles.

Allow the first layer to set atleast for two hours else the colors will blend together and wouldnt layer properly.

Be creative and patient to make more colorful layers.

Photobucket

Written by: Nithya
Send in your queries by clicking here.


Popular Posts

Flickr Photostream

www.flickr.com
nits food clicks' items tagged with nitsclicks More of nits food clicks'
Featured on Baking is Hot
my foodgawker gallery
Foodista Drink Blog of the Day Badge