Wednesday, September 26, 2012

Akki Roti - Reader's Choice

Photobucket


Did you all know 4th Sense Cooking has a Facebook Page!! :) Yup, here is the link - https://www.facebook.com/pages/4th-Sense-Cooking/112258548818620 

There are 1000+ fans who make it happen (absolutely humbled and happy). Its so magical to get in touch with the readers and makes me feel so excited that I have so many friends who really try my recipes :)    

Last month while I was going through my repository of images, I found some interesting pictures of herbs and  spices. Bling!! Posted one of them and asked my buddies to guess the spice and there were answers pouring in and most of them were right. It was the cocoa bean that I posted :) I had announced that one lucky winner would be able to see their recipe here on my blog and so is this mighty Akki Roti :) 

There are contests coming up every month. So just go ahead, like my page and participate to win exciting prizes. :)

Drum roll... Kirthana Aditya was the random winner of that contest and she was sweet enough to contribute the recipe for Akki roti - Karnataka styled recipe to me as soon as I mailed her. Here are few lines from her - 

I am Kirthana Aditya. Have been married for 6 years and that's my real length of experience in cooking as well!

So, why am I interested in cooking? Well, my mother in law is a great cook, I have learnt most of my cooking from her. The second reason is my husband (PS: fed by my mil for 25 years!); whether he can cook or not is never contested, but he is a great food critic. So, with no other option in sight, I became interested in cooking well. Now, following my husband's footsteps is my son, Sriram, who is hardly 6, and can perfectly figure out what's wrong in the dish! My sister is my partner-in-crime. We cook together watching cookery videos on YouTube! 

Today, it has become a passion and now, it's like, I love to cook new dishes and recipes. I constantly search for different recipes on the web and try them out. One such search result is 4th sense cooking, simple and easy-to-do recipes with ingredients at home. I even hold a copy of the 4th sense recipe book.           

Thank you so much Kirthana for introducing a delicious recipe to me and my readers. :)

Photobucket


Ingredients:

Rice flour - 2 cups
Cumin Seeds (Jeera) - 2 tsps
Onions - 2
Green chilies - 3
Coriander leaves - 1/2 bunch
Coconut (scrapped) - 1/2 cup
Salt - for taste
Water

Method:

Step 1: Take rice flour in a large mixing bowl.

Step 2: Add jeera to it.

Photobucket

Step 3: Chop onion finely and add it to the bowl. 

Step 4: Chop green chilies finely and add it too. 

Photobucket

Step 5: Drop in chopped coriander leaves. 

Step 6: Put the grated the coconut into the mixing bowl too. 

Photobucket

Step 7: Add salt. 

Step 8: Heat 2 cups of water until it is warm. Now add the water little by little to dough and mix well until everything comes together into a soft and spreadable dough. 

Photobucket

Step 9: Leave the dough closed for half an hour. 

Step 10: Take a plastic sheet and grease it with some oil. Pinch a large ball of dough and place it on the sheet and pat it until it is an evenly spread circle of 1/2 inch thickness. 


Photobucket

Step 11: Place the sheet down side on a well greased pan and remove the sheet carefully leaving the akki roti on the pan. 

Note: You can pat the dough into a thin circle directly on the pan too. But see to that you have atleast two pans to alternate and use so that one becomes cool enough to handle while the other is on the stove. 

Step 12: Pour few drops of oil and roast on both the sides. 

Photobucket

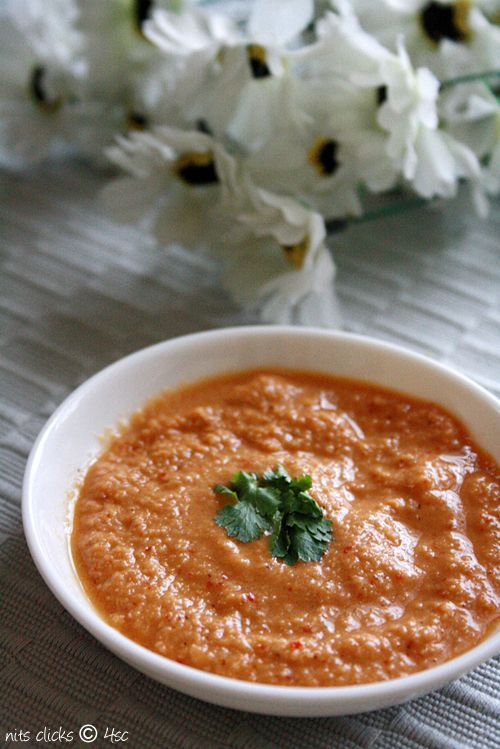
Serve the hot akki roti with jaggery, sugar or chutney of your choice. 

I served it with urad dhall chutney. Click on the chuntey image for the recipe. 

Photobucket

Written by: Nithya
Send in your queries by clicking here

Monday, September 24, 2012

Hummus - Mediterranean Dip

Photobucket

Mediterranean cuisine comprises of food from 21 countries that surround the Mediterranean Sea such as Italy, France, Spain, Greece, Egypt, Turkey, Levant (Cyprus, Jordan, Lebanon, Palestine, and Syria), and various other countries adjacent to the Mediterranean sea. 

So many countries and so much variety isn't it :) One of the first few dishes I tried from the Mediterranean cuisine was this humble dip called Hummus. Its is simple to make and simply delicious to eat. It goes great with freshly made pita breads. 

My attempt of pita bread dint work great this time hence I simply bought a pack of French brown bread and enjoyed my hummus :)  

I'm sure you would get tempted to try it out too after you go through the simple ingredients list :)

Photobucket

Recipe adapted from My Jhola

Ingredients:

Chickpeas (Channa) - 1 cup
Sesame seeds - 1 tblsp
Sesame oil - 1/2 tblsp
Garlic - 4 pods
Lemon juice - 1 tblsp
Olive oil - 1/4 cup
Salt - to taste
Cumin seed powder and chili powder to sprinkle on top

Photobucket

Method:

Soak chickpeas in water over night. 

Cook the soaked chickpeas until tender. 

Dry roast the sesame seeds until light brown. Allow it to come to room temperature. 

Now grind chickpeas, sesame seeds, olive oil, sesame oil, garlic, lemon juice and salt together into a smooth paste. 

Hummus is ready to serve. 

Collect the hummus in a large serving bowl, make a well in the center and add olive oil liberally and sprinkle cumin seed powder and chilly powder. Serve with hot pita bread or any bread of your choice and enjoy :)

Photobucket

Tips:

If you have ready made tahini you can simply skip using sesame seeds and sesame oil and replace it with 2 tblsp of tahini to make your hummus. 

You can store hummus in an air tight container for about 10 days if kept in the fridge. 

Photobucket

Written by: Nithya
Send in your queries by clicking here

Friday, September 21, 2012

My First Live Baking Demo

Photobucket


I have graduated just a step ahead, from experimenting level to teaching level. Oops sounds like a dream already :)

Yes! I did my very first cake baking demo session for a group of 35 enthusiastic women. The occasion was Rotary club Ann's meet and I got a call from one of the members who was part of the hosting group. She has been following my blog for a long time and has appreciated my work many a times. 

She asked me if I could do a simple cake demo for them! I was completely nervous, thrilled and anxious when she said that. Couldn't deny her request but was completely scared to do it since it was going to be a demo for 35 home chefs who have been expert in their kitchens. 

Will I be able to convince them with my baking? Will they like my demo? Will the cakes come out well? Will I explain the method properly? Will I stammer? Will I be able to answer their queries? and so on and on and on was running in my thoughts.. But finally patted my back myself and boldly accepted to do the demo for them since its just going to be a demo of my very own PASSION - Baking :)

Check out 
Recipe for Dark Fantasy Cup cakes. 
Recipe for 1 min microwave cake.
Recipe for eggless orange cake.

Photobucket

I showed them a demo of simple eggless chocolate cake baked in two methods. First one was a quick magical 1 min microwave cake and second was the convection mode method for the more traditional baking experience. 

The demo session went on for 45 mins with keen listeners. The microwave cake was whipped up in minutes and the magic was completely putting all of them into a lot more of enthusiasm :) I was by then pretty comfortable talking loud and giving instructions. We had a couple of jokes cracked for the ice breaking and all were set in a good mood for the next cake. 

Photobucket

Next I baked dark fantasy mini cup cakes for them. It was so much fun to fill the mini cups with batter and anxiously wait looking through the glass of the oven to see it raise and I hear clap clap clap from the audience. Baking is truly magical and brings a lot of smiles :) 

Meanwhile I taught them all to whip some fresh cream, flavor them with some coffee powder and pipe some peaks on the cute like cuppy cakes :)

The picture below would show you the enthusiastic ladies try their hands on piping cream :)

Photobucket

Oh yeah! I forgot to introduce the large birthday cake that I baked for CM! 

Lol.. If you thought it was Chief minister, then you are wrong. It was the birthday of the host  couple. 

Guess what?! The husband and wife both were born on the same date of different years. Isn't that cute and interesting?! :) I was so happy to take their birthday cake order and baked them a large 2 kg cake of orange and vanilla flavor. You guessed it right. The man likes vanilla and the women likes orange so it was a blend of both flavors for them :) 

I baked a 4 layered cake with orange and vanilla alternatively. I so wish I could post a picture of the slice showing the alternate flavors and colors but no no says the birthday cake :( 

I used fresh cream icing of both the flavors and did a decent piping work I guess :P 

The couple and the guest enjoyed the demo as well as the cake :) 

It was perhaps a day to remember for me :)

Photobucket

Written by: Nithya
Send in your queries by clicking here

Thursday, September 13, 2012

Mint Squash - Stepwise Pictures


Photobucket

Fresh fresh mint! A drink that can make you fresh instantly and a drink that you can make instantly as well :)

A few simple steps and you are all set with a squash to store and treat yourself and your guests in a giffy.

What are you waiting for? Get set go to make it...


Photobucket

Ingredients:

Mint leaves - 1/2 bunch
Sugar - 1 1/4 cups
Water - 1 cup
Salt - A pinch
Citric acid (Lemon salt) - 1 tsp
Ginger - 1/2 inch piece

Photobucket

Method:

Step 1: Grind the ginger in the mixie by adding a tsp of water.

Step 2: Take water and sugar in a heavy bottomed vessel and boil until the sugar melts and bubbles up.

Photobucket

Step 3: Remove the sugar syrup from flame and strain the ginger juice into it.

Step 4: Stir in the salt.

Photobucket

Step 5: Add a tsp of water to the citric acid crystals and mix until it dissolves. Now add it to the syrup.

Step 6: Drop in the washed mint leaves. Close the vessel with a plate and leave it untouched for 3 hours.

Photobucket

Step 7: Filter out the mint leaves.

Step 8: Add few drops of water to the food color to dilute it and add it to the squash.

Step 9: Store in a sterilized container. It keeps well in the fridge for 6 months.

Photobucket

Step 10: Fill 1/8th of the serving glass with the squash and mix rest with cold water. Serve chill with a mint leaf on top.

Photobucket

Written by: Nithya
Send in your queries by clicking here.


Thursday, September 6, 2012

Rice Flour Fryums / Vadaam / Odiyalu

Photobucket

Crunchy crunchy yummmm :)

Fryums are every kid's favorite. Oh thats too biased a statement, its rather everyone's favorite :) I am no exception. Especially the home made ones are absolutely yummy. I like the process of making it too. Eating few while they are half dried is the best part of making them at home :)

Summer has almost gone but do you think the sun isnt shining bright now?? Oh Chennai, its summer for you all year long. So its never late to make home made fryums. :)

How smart could I get with those words to make up the late posting of fryums :P I really really wonder how I missed to post this one. The pictures were left untouched in my spare memory card and my memory loss added to it. Anyways here it is for you all :)

Photobucket

Ingredients:

Rice flour - 1 cup
Water - 5 cups
Green chillies - 3
Asafoetida - 1/2 tsp
Salt - for taste
Food color of your choice

Photobucket

Method:

Mix the rice flour in 1 cup of water.

Heat the remining 4 cups of water and when it starts to boil, simmer the stove and pour in the rice flour water mixture gradually and mix well. Cook over medium heat until it thickens and becomes semi transparent.

Don't make it too thick. Stop when it is in pouring consistency.

Grind green chillies coarsely and add it to the mixture along with food color, salt and asafoetida. Mix thoroughly.

Allow this to come to room temperature.

Now spread a plastic sheet in your terrace or wherever there is direct sun light. Drop 1 tsp of batter at a time to make small circles of 2 cms diameter. Do this until you complete the entire batter.

Let this get dried up the entire day for the next 2 days.

Note: Remove and keep them in dry place during nights and spread it under the sun next morning.

Photobucket

After 2 days of drying, peel them off the sheet and put them all in a plate and again dry them under the sun for a day or two. Once it is completely dry, store it in air tight containers and use.

Rice flour fryums are ready :)

Fry them in hot oil until it just puffs up. Remove and leave them on a paper towel for few mins before serving.

Enjoy the crispy crunchy home made rice flour fryums :)

Photobucket

Written by: Nithya
Send in your queries by clicking here.


Popular Posts

Flickr Photostream

www.flickr.com
nits food clicks' items tagged with nitsclicks More of nits food clicks'
Featured on Baking is Hot
my foodgawker gallery
Foodista Drink Blog of the Day Badge