Tuesday, August 31, 2010

Choco Vanilla Spiral Cookies


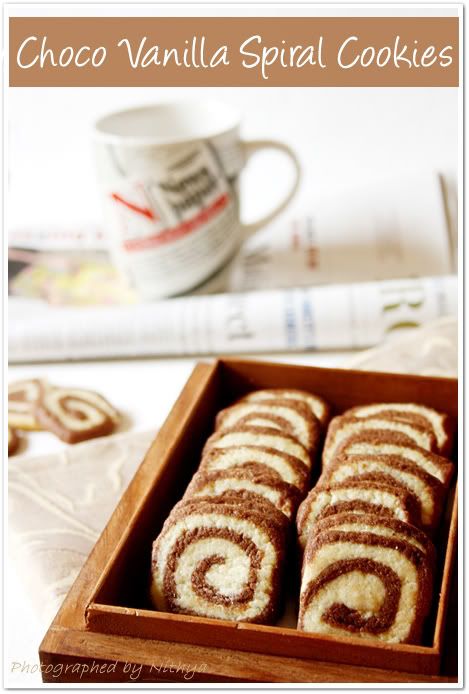
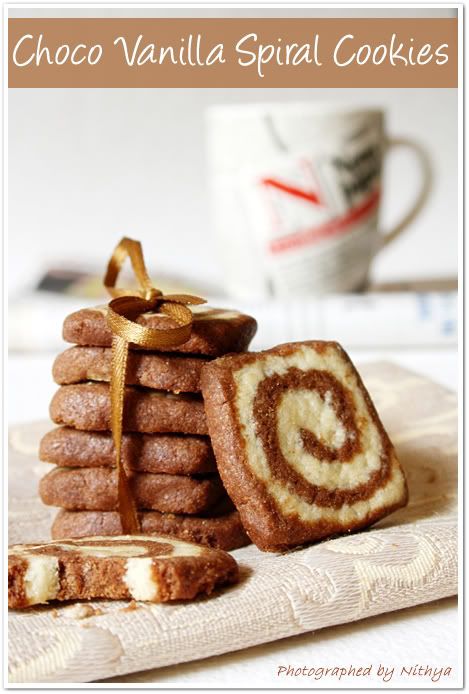
The foodie in me freaks out when I come across some interesting recipes. And it was at this recipe that I lately got too excited about and could not wait to make them.

Choco vanilla spiral cookie is the most exciting looking cookies according to me. Found a nice step wise explanation of making this cookies in Edible garden blog by Nags. She is simply awesome at what she does. I totally got impressed and immediately set to bake it in my own style by adding a pinch of my creative twist to it :)

The recipe is pretty much the same with just a small change of adding a little more of sugar to the cocoa dough since I like my cookies a little more sweeter.

Get set go for an exciting cookie experience :)


Ingredients:

For the vanilla dough:

All purpose flour(Maida) - 1 1/2 cups
Unsalted butter - 1/2 cup
Powdered Sugar - 1/2 cup
Egg yolk(beaten) - 1/2
Vanilla essence - 4 drops

For chocolate dough:

All purpose flour(Maida) - 1 1/4 cups
Unsalted butter - 1/2 cup
Powdered Sugar - 2/3 cup
Egg yolk(beaten) - 1/2
Unsweetened cocoa powder - 1/4 cup


Method:

To make the vanilla dough, first bring the butter to room temperature and beat sugar along, till it incorporates well. Now beat in the egg yolk and vanilla essence.

Add the sifted all purpose flour to it and combine with hands until everything comes together. Do not over beat. Just combine until it forms a soft dough. Cover it with cling film and keep it aside.

To make the chocolate dough, beat butter and sugar together and then add the egg yolk to it. Now add the cocoa powder and mix well without lumps. Finally pour in the all purpose flour and combine till it rolls into a soft dough. Cover it with cling film too.

Now refrigerate both the doughs for half an hour.

After half an hour, roll both the doughs into a flat rectangle of 1/4" thickness on a transparent plastic sheet. If you are not able to roll them into a rectangle shape, just trim the edges and make them into equal sized rectangles.

Now comes the tough part. Lift the chocolate layer and place it on top of the vanilla layer showing just 1/4" of the vanilla layer on top(This will help you get a clean swirl when you roll it)

After placing it, gently start rolling the layers until you form a log. Now cover it again with cling film and refrigerate for half an hour. This will make the dough firm and will be easy to cut.


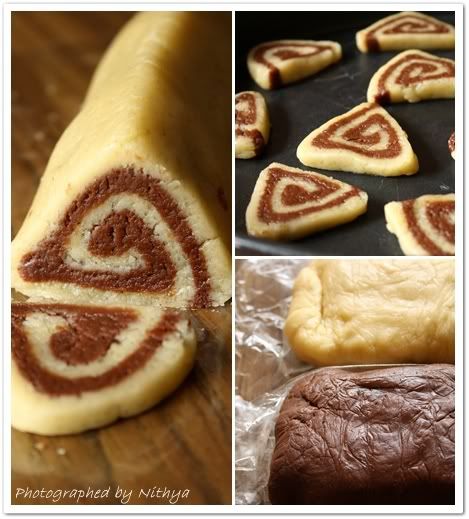
After half an hour remove it from the fridge and cut them into slices of 1/4" thickness.

Preheat the oven at 350°F or 180°C.

Place the sliced cookies on a baking tray and bake for 10 - 12 mins. Check after ten mins to note if the vanilla part has turned into light golden color.

If done, remove the cookies and let it cool on a wire rack for ten mins.


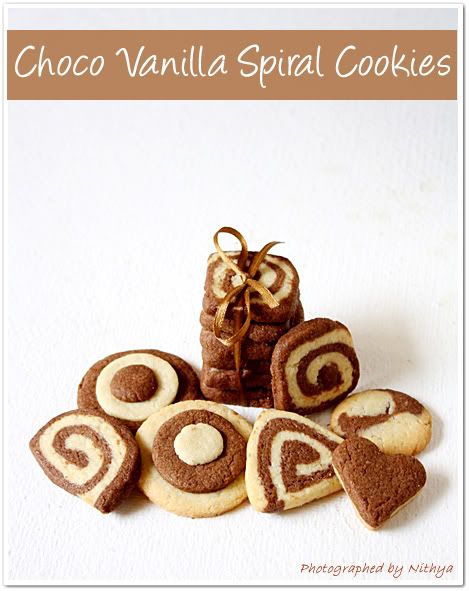
Choco vanilla cookies is ready to eat :)

This quantity should make around 28 large circular cookies according to the source recipe. But since I experimented various patterns of small sized cookies, I could make 70 cookies out of the dough ;) Oops :)

Enjoy eating the zebra cookies :)
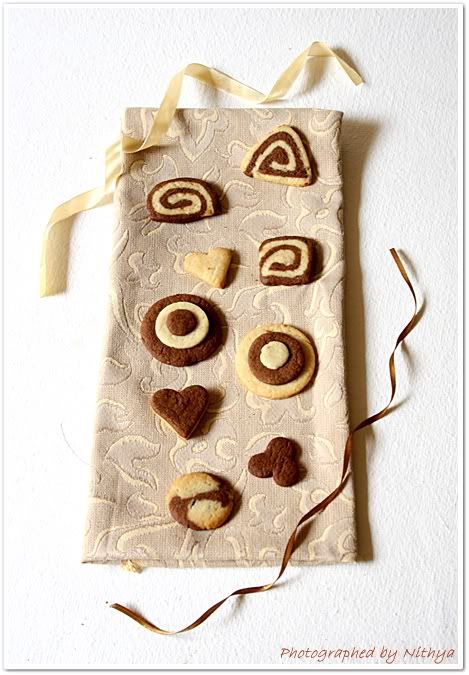


Note:

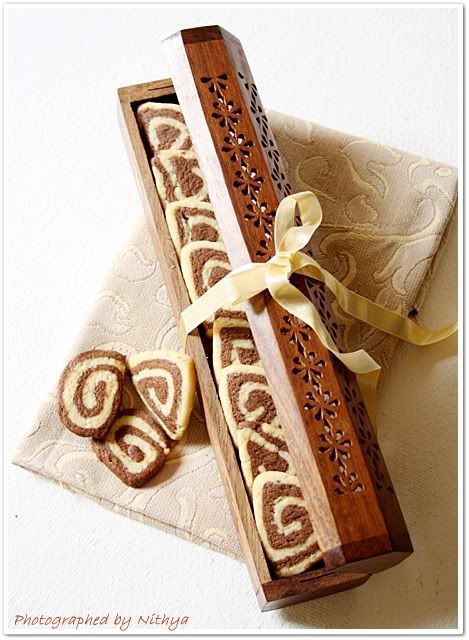
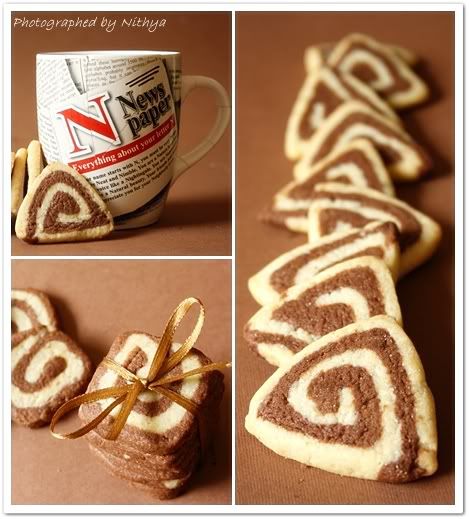
Freak out with the shapes. You have a lot of scope to create interesting stuff because of the two contrasting colors.

  • I tried triangle shaped swirled cookies by pressing the dough on three sides and then cutting them into slices. :)
  • Pressed them firmly on four sides to make square swirl cookies. :)
  • Made a semi circle by pressing one side of the roll and then slicing. :)
  • Layered white and brown alternatively to make circular layered cookies. :)
  • Mixed both the doughs and made marble cookies. :)
  • Rolled the dough into sheets and cut out heart shape using the cookie cutter and layered the chocolate heart over the vanilla one to make double layered heart cookies. :)
  • And also made independent vanilla and chocolate cookies. :)
No wonder all of them tasted the same and yummmmmmmy :)


I am happy to send this post as an entry to Pari's "Only kids delight" event.


Written by: Nithya
Send in your queries by clicking here.


Wednesday, August 25, 2010

Gooseberry Curd Pickle / Nellikai Oorugai

Gooseberry curd pickle3

Pickles are a common sight in every Indian's home and especially at my place. Mom and granny make a lot of varieties of pickles. Infact an entire rack of my fridge is filled with pickles like mango pickle, onion pickle, lemon pickle, ginger pickle and so on..

Now this gooseberry pickle is the new entry and for sure one of the best :) yummm.. its simply too good with curd rice.

Gooseberry is easily available almost throughout the year and hence this pickle can be made anytime. But the curd factor gives it a short shelf life of max of 15 days if stored in airtight container and left in the fridge.

Gooseberry curd pickle1

Ingredients:

Gooseberry / Nellikai - 10
Curd - 1 cup
Green Chilly - 2
Chilly powder - 1 tsp
Turmeric powder - 1/4 tsp
Asafoetida - 1/4 tsp
Cumin powder - 1/2 tsp
Salt - for taste

Gooseberry curd pickle2
Method:

Pressure cook the gooseberries. Cut them along their lines and remove the seed.

Now in a bowl, take the curd and churn it well using a whisk. Add chilly powder, turmeric powder, cumin powder, asafoetida and salt to it and mix well.

Now drop the cooked gooseberries into it. Finally temper mustard and split green chillies and add it to the pickle.

Allow it to marinate for a day.

Yummy and tangy gooseberry curd pickle is ready to serve. :)

Serve with curd rice. :)

Enjoy making. Happy eating :)

Gooseberry curd pickle

Written by: Nithya
Send in your queries by clicking here.

Tuesday, August 24, 2010

Happy Raksha Bandhan

Raksha Bandhan2

Happy Raksha Bandhan to all my brothers :)

Raksha Bandhan is a day to celebrate the sacred bond of affection between siblings with lots of josh.

This festival is primarily a north Indian festival that is celebrated by all brothers and sisters to express their deep emotions, love and affection. Of course as I said, I celebrate every festival and occasion :)

Raksha Bandhan4

On the day of Rakhi festival, the sister ties Rakhi on the wrist of her brother and both make prayer to God for the well being of each other. In return, brothers make promise to take care of his sister under all circumstances and they gift something to the sister to mark the occasion. :) And that is the best part ;)

This year, none of my brothers are here to make my day special :(

But I personally dedicate this post to all my sweet brothers all over the world :) Love you all :)

And also dedicate it to all the sweet brothers and sisters in the world :)

Raksha Bandhan1

Fruit Rakhi

Used a diagonally cut slice of apple, water melon, white guava, red guava and cherry for the center part and used the yellow rind of yellow watermelon for the thread part :) And drizzled some honey on top of the rakhi fruit salad to complete it ;)

Raksha Bandhan3

To all my dear Brothers, its the perfect time to tell you just how special you all are and how much you all mean to me.
Wishing you peace, prosperity and success on this Raksha bandhan and forever :)


Raksha Bandhan

I am happy to send this post as an entry to Indian Khana's, "Festive Food ~ Rakhi | Raksha Bandhan 2010" event.


Written by: Nithya
Send in your queries by clicking here.


Monday, August 23, 2010

Chakka Pradhaman - Onam Special

Chakka pradhaman3

WISH YOU ALL A VERY HAPPY ONAM :)

I am not a Malayali, my origin is not Kerala, I am not sure if Mahabali comes to Chennai!!!

But I am a true Indian who loves all the tradition in our county and would also love to celebrate every single reason I get. :)

Every state in India has its special festivity and fantastic histories behind it. Festivals bind us together and brings happiness around. :) Do I need any better reason?

So I am all set to celebrate Onam, the festival of Kerala. :)

Onam falls during the first month of the Malayalam calendar which is Chingam (August–September) and marks the homecoming of the legendary King Mahabali. The festival lasts for ten days and is linked to many elements of Kerala's culture and tradition. Intricate flower carpets, elaborate banquet lunch, snake boat races, Puli Kali, and the kaikottikkali dance all play a part in the festival. :)

Chakka pradhaman was the delicacy that I choose to make since I am a big time Jack fruit fan and the richness with coconut milk makes me totally drool for it :)

Chakka pradhaman2

Ingredients:

Ripe jack fruit - 12
Coconut milk - 1 cup
Jaggery - 1/2 cup
Cardamom powder - a pinch
Ghee - 2 tbl sp
Cashews
Coconut pieces
Salt - a pinch

Chakka pradhaman5

Method:

Chop the jack fruit and puree it into a fine paste.

In a pan take a tsp of ghee and pour in the jack fruit paste along with just a little water if the puree is too thick. Allow this to cook on medium flame for around ten minutes.

In a vessel, boil the jaggery along with 1/4 cup of water till it melts. Once done filter it to remove impurities.

Transfer the jaggery syrup to the cooked jack fruit pulp and let it all boil on medium flame for ten minutes. Now simmer the stove and add the coconut milk to it and whisk well to blend everything and switch off the flame. Do not let it boil after the coconut milk is added, it will start separating.

Take the pradhaman off the fire and add the cardamom powder. Fry cashews in ghee until golden brown and also fry the coconut pieces separately and add them all to the pradhaman as well.

Chakka pradhaman is ready to eat. :)

Serve it warm. :)

Enjoy making. Celebrate the day with this yummy delicacy. :)

Chakka pradhaman


Aishwaryavum, Samriddiyum Niranja nalla nalukal ennum undavatte oppam manassil snehathinte oru onam. HAPPY ONAM TO ALL! :)


Chakka pradhaman1

Written by:
Nithya
Send in your queries by clicking here.


Friday, August 20, 2010

Palak Paneer

Palak Paneer4

I'm Popeye the Sailor Man,
I'm Popeye the Sailor Man.
I'm strong to the finich
Cause I eats me spinach.
I'm Popeye the Sailor Man.

I love the cartoon series as well as spinach :) It used to be too inspiring to see Popeye growing into a macho man after gulping his can of spinach. So I'm going to grow stronger with it too :)

Palak becomes yummier with the addition of paneer to it :) Some cheese and fresh cream topping makes it richy rich :) Forget your weight gaining sins and freak out with this delicacy.

Palak Paneer5

Ingredients:


Spinach(Palak) - 2 bunches
Moong Dhall - 1 tblsp
Tomatoes - 2
Onions - 2
Garlic - 10 pods
Cumin Seeds - 1/2 tsp
Green Chillies - 2
Finely chopped onion - 1 tblsp
Dhaniya powder - 1 tblsp
Sugar - 1 tsp
Chilly powder - for taste
Garam masala - for taste
Aam chur powder(Raw mango powder) - for taste
Salt - for taste
Paneer cubes - 250 gms
Grated cheese - 1 tbl sp
Fresh cream - 1 tbl sp(optional)

Palak paneer 7
All thanks to Latha aunty for the very cute Ghana Mask :) Love it :)

Method:

Chop palak finely and cook it along with moong dhall in the pressure cooker adding some water to it.

Chop onions and tomatoes roughly and peel garlic. Now heat 1 tblsp of oil in a pan and add garlic, chopped onions and tomatoes and fry for few minutes. Allow it to cool and grind it along with the cooked dhall and palak.

Take a few tsps of oil in a shallow pan and temper cumin seeds. Fry slit chillies and finely cut onions just for a minute. Add dhania powder and fry for a second, then pour ground mixture with enough chilly powder, garam masala, aam chur powder,salt and sugar. Add enough water to make gravy. Allow it to boil in a medium flame, stirring now and then. When the gravy turns thick enough, gently mix in the fresh paneer cubes.

Remove from fire and pour it into a baking dish and sprinkle the grated cheese on top and microwave for two minutes till the cheese melts.

Serve garnished with fresh cream on top.

Creamy palak paneer is ready to eat :)

Enjoy the exotic delicacy with roti, chapathi or any India bread :)

Happy making :)

Palak Paneer

Note:

Keep the salt level a little low in the gravy since the cheese that is added at the end contains salt too.

Hotel versions skip the use of moong dhall and hence it is optional.

You can serve finely cut onions and a slice of lemon along with it.

Palak Paneer2

I am happy to send my Palak Paneer, Creamy Muttar Paneer and Patriotic skewers to "Lets relish - Paneer" event by versatile blogger Jay of Tasty Appetite.


Written by: Nithya
Send in your queries by clicking here.


Wednesday, August 18, 2010

Cauliflower Pepper Korma

Cauliflower Pepper Korma3

Chapathi or roti with healthy vegetable korma can be the best menu for dinner. I have been following this mantra for quite sometime now and I simply feel lite and good before I hit the bed. :)

Cauliflower and peas make a finger and nail combination. They go so well together and this combinational korma was finger licking too :)

Pepper adds the spicy oomph factor to the korma. :)

Cauliflower Pepper Korma2

Ingredients:

Cauliflower - 1
Green Peas - 1 cup
Tomato - 2
Onion - 1 (big)
Garlic - 5 pods
Ginger - 1/2 inch piece
Pepper - 1 tsp
Cumin - 1 tsp
Chilly powder - for taste
Corn flour - 2 tsp
Sugar - 1 tsp
Salt - for taste

Cauliflower Pepper Korma

Method:

Cook cauliflower and peas. Dice tomatoes into small cubes. Grind ginger, garlic and onion together. Powder the pepper and cumin seeds.

Once all the above is ready, take a pan and add two tsps of oil and fry the tomatoes till tender. Add the ginger, garlic and onion paste and fry for few minutes till the raw smell goes and your kitchen starts smelling heavenly.

Now add the cooked cauliflower, peas, pepper powder, cumin powder, Chilly powder, sugar and salt into the pan. Add adequate water to make gravy and allow it to boil for a while.

Mix in the corn flour with just a little water and add it to the gravy stirring it continuously. This gives the gravy a slightly thicker consistency and also the shine ;) I do this addition to most of my kormas to combine the vegetables well with the gravy.

Scrumptious Cauliflower Pepper korma is ready to serve. :)

Serve with chapathi, roti or any Indian bread of your choice :)

Cauliflower Peas Korma4

Note:

For additional taste, you can smear some salt and half cook the cauliflowers and deep fry them in oil before adding it to the gravy.

I love it that way, but dint make it due to weight consciousness ;)

Cauliflower Pepper Korma1

Written by: Nithya
Send in your queries by clicking here.

Sunday, August 15, 2010

Independence Day Special - Patriotic Skewers

Partiotic skewers4

At the strike of midnight of the August 15, 1947, India shook off the shackles of British Rule and became free. It was a night to be remembered always :)

Yes!! We Indians proudly celebrate out Independence day today :)

The feel of patriotism has spread all over and the celebrations of the day are remarkable.

It is celebrated with flag hoisting ceremonies and cultural programs all over the country. The main program is held at the Red Fort where the Prime Minster unfurls the National Flag and it is saluted by Guns.

My blog owes to celebrate the wonderful occasion too.

Here I go with skewers that represent our beautiful national flag :)

Partiotic skewers5
Note: The blue bead is just for decoration and not edible ;)

Ingredients:

Bell peppers / capsicum (Red and green)
Cottage cheese (Paneer) cubes
Wooden skewers or tooth picks
Lemon extract
Chilly powder
Gharam masala
Salt

Partiotic skewers

Method:

Dice the bell peppers and paneer into cubes.

Thread them into the tooth pics sending in the green capsicum first followed by paneer and red capsicum piece.

Apply some olive oil on your skillet and arrange the skewers on it to roast them. Turn the skewers in intervals to roast them on all the four sides.

In a plate mix some lemon extract, salt, gharam masala and chilly powder to make a paste.

Now apply the lemon chilly paste to the roasted skewers and allow it to marinate for few mins.

Simple and colorful skewers are ready to serve. :)

They are healthy, spicy and attractive snacks to serve as starters :)

Happy making :)

Partiotic skewers1

Note:

The seasoning and the choice of vegetables is upto your imagination. Freak out with your own choice :)

Grilling the vegetables is a good option if you have facilities. Else roast it as I have said above.

Partiotic skewers2

Written by: Nithya
Send in your queries by clicking here.


Friday, August 13, 2010

Nagar Chathurthi - Godumai Appala Urundai / Wheat Papad Balls

Wheat Papad Balls

Nagar Chathurthi is a festival dedicated to the snakes. We pray to Nagar the snake god and do pooja as well. :)

Snake worship without any doubt, owes its origin to man's natural fear for these reptiles.However, in Hindu culture, they own a prominent place. Hindu mythologies are filled with stories and fables about snakes, the most important being the Sheshnaga of Lord Vishnu.

This is a popular festival in Andhra, Karnataka and Maharashtra.

I had posted about this festival last year with more details on the pooja and a different set of offerings too. You can take a glance of it here.

Naga chathurthi specail5

Last year we made three kinds of sweet balls namely Sesame Sweet balls, Roasted gram sweet balls and peanut sweet balls.

But this time for a change we decided to make a new variety along with the usual ones.

Godumai appala urundai translated as wheat paapad balls is what we came up with. :)

I wouldn't claim it as new, but its pretty rare that you see this one. Its a simple yet very interesting snack.

Though the steps make it sound cumbersome, its really worth it. :) I can bet on it :)

Naga chathurthi specail4

Ingredients:


Wheat flour - 1 cup
Sugar - 1 cup
Oil - to fry
Salt - a pinch

Naga chathurthi specail3

Method:

Take wheat flour in a bowl and add a pinch of salt to it. Pour in just enough water to make a thick dough(Chapathi dough consistency).

Now roll out thin chapathis and let them dry on a paper for 20 mins. Later poke holes on the chapathi using a fork. Now deep fry it till crisp on both sides. Once you are done with all the chapathis, break them using your hand.

Powder the sugar and keep it aside. Run the broken papads in the mixie to powder it too. Mix both the powders on a paper and then once again put them in the mixie and run ones.

Transfer it to a plate and roll them into balls.

Appala urundai is ready to eat :)

Enjoy making :)

Naga chathurthi specail1

Other than the sweet balls, we also make Sweet poha and spiced poha too as offerings.

You can find the sweet poha recipe here.

Naga chathurthi specail6

Above is a small glance of the pooja at my sweet home :)

Happy Naga Chathurthi to all those who celebrate it :)

Nagarchathurthi Special6

Written by: Nithya
Send in your queries by clicking here.


Popular Posts

Flickr Photostream

www.flickr.com
nits food clicks' items tagged with nitsclicks More of nits food clicks'
Featured on Baking is Hot
my foodgawker gallery
Foodista Drink Blog of the Day Badge