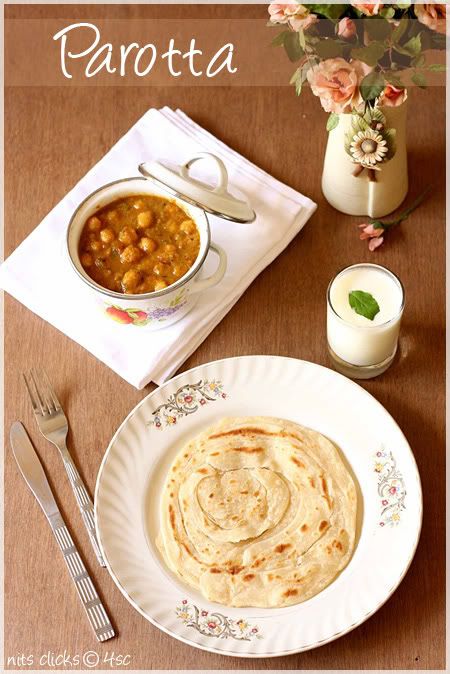
Parotta is one of the most interesting dish not just to eat but to make as well :)
I have loads of memories of admiring the road side parotta stalls. The parotta master(that is how the chef is called locally :P) does it so tactfully and with ease. He literally flies the dough in the air to expand it rather than rolling on the workspace and its such a treat to watch them do that :) The end result of such magic would be a super flaky and layered parotta.
Parotta has been my favorite since childhood. I remember making them all by myself when I was doing my ninth class ;) and have become almost an expert in making them ever since ;)
Parotta can be made in various methods and I have seen lot of people following harder methods and calling it difficult to make as well. So just thought of posting the method that I follow which isn't as hard as we think!!
Come on.. give it a try :) I'm sure you would love it too :)
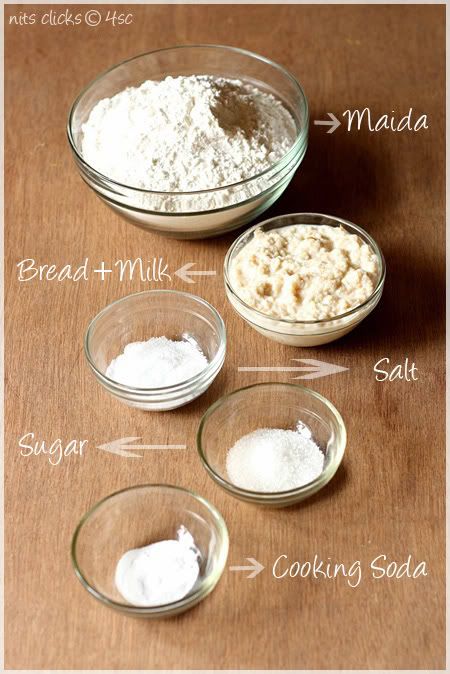
Ingredients:
All purpose flour - 4 cups
Bread - 5 slices
Milk - 1 cup
Sugar - 2 tsp
Cooking soda - 1/2 tsp
Salt - for taste
Water - adequate for making dough
All purpose flour - 4 cups
Bread - 5 slices
Milk - 1 cup
Sugar - 2 tsp
Cooking soda - 1/2 tsp
Salt - for taste
Water - adequate for making dough
Method to make dough:
Crumble the bread and add it to the milk. Mix it well with your hands till it becomes into a paste.
Take the maida, salt, cooking soda and sugar in a bowl. Add the bread and milk mixture to it and mix well. Add adequate water to it and make dough. Kneed the dough for fifteen minutes. Make a huge ball and apply few drops of cooking oil on top and leave it aside in a bowl for atleast for two hours.
Method to make Parotta:
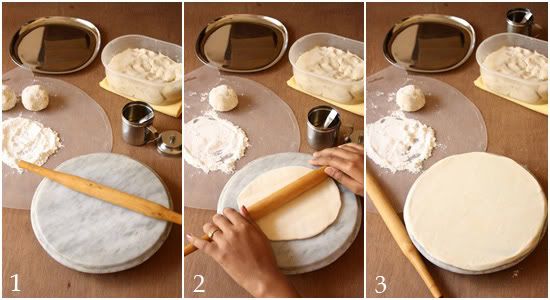
- Set your work surface ready. Pinch large lemon sized balls from the dough and roll into balls. Spread a cup of maida on a paper. Keep half a cup of cooking oil ready.
- Roll the ball of dough into a circle of 3mm thickness.
- Roll until it is pretty big or until it is as big as your work space.
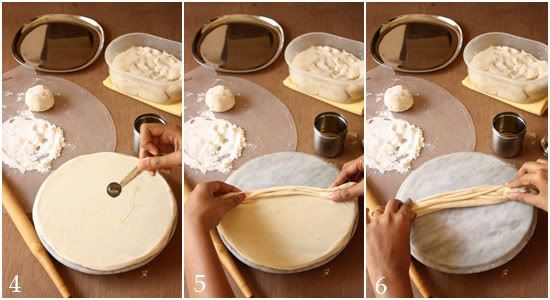
- Brush one tsp of oil on the rolled dough.
- Now fold like a fan or saree pleats from one end to another.
- Hold the ends with your hands firmly.
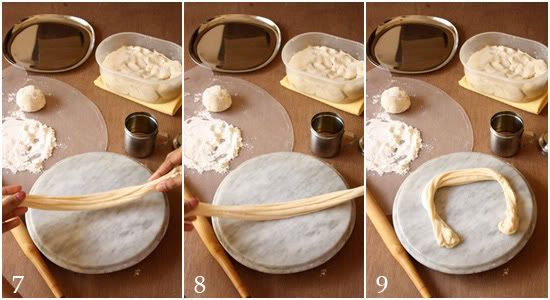
- Lift it and tap it on the stone.
- Now pull it slightly while tapping until it becomes a bit longer.
- Roll from one end to another.
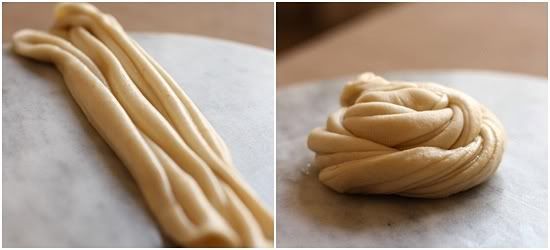
- Seal the end by pressing it on top.
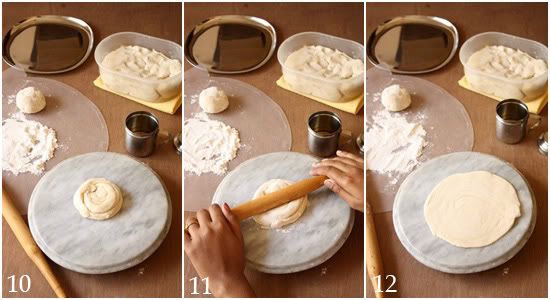
- Dust the work space and the rolled ball with some flour.
- Roll it again into a slightly thicker circle. Keep in mind not to press it too hard while rolling which will merge the layers.
- Roast the Parotta on a skillet adding few drops of oil on both the sides. Keep the flame on midium and roast until you get golden brown spots all over.
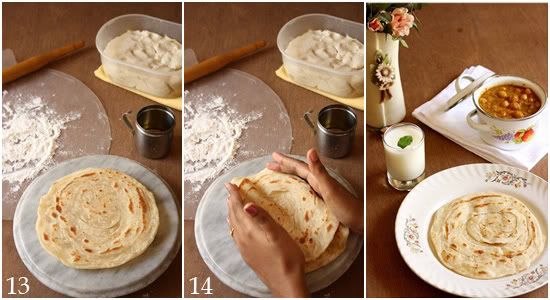
- Stack two or three parottas together and beat them well with two hands on the sides to make them flaky.
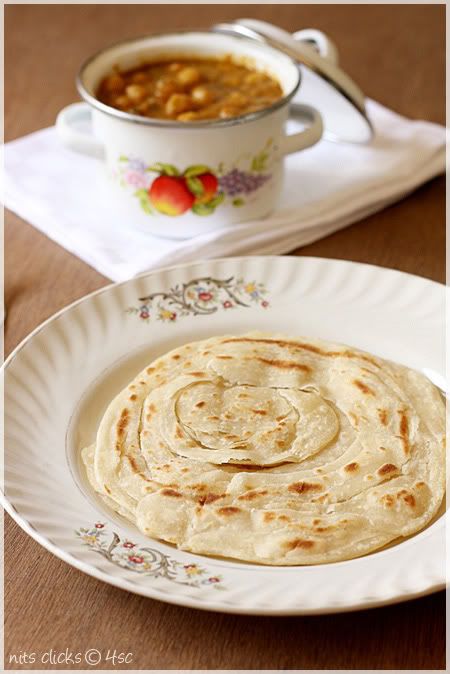
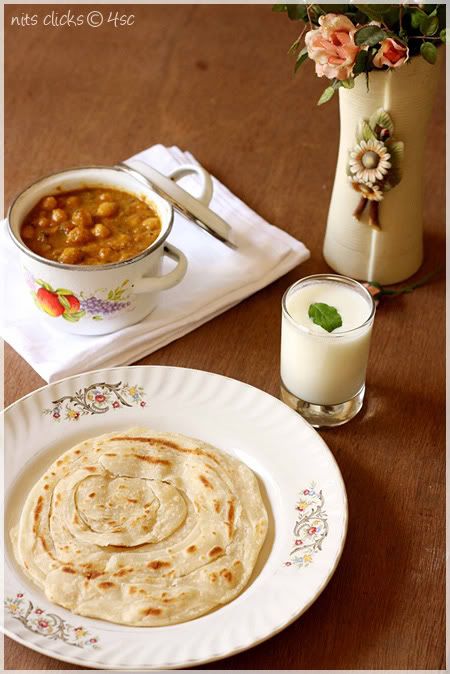
Serve them hot with subzi of your choice. I served it with channa masala.
This quantity would make approximately 25 parottas.
Enjoy making :) Happy eating :)
Tips:
Use fresh bread for making the dough. The yeast in the bread will make help in making the parottas soft.
Beating the roasted parottas is a very essential step to make it flaky and expose the layers.
Use fresh bread for making the dough. The yeast in the bread will make help in making the parottas soft.
Beating the roasted parottas is a very essential step to make it flaky and expose the layers.


Wow--you are nothing short of a parotta master!!Lovely looking parottas..great addition of bread!
ReplyDeletenice !! adding bread is new to me..thanks for the illustrations !
ReplyDeleteLoved the addition of bread...never added it before...n I roll the parotta in a similar way..lovely layers...looks just perfect
ReplyDeleteTruly blessed with artistic hands.Every thing you touch turns into art.
ReplyDeleteAdding bread is totally new to me..looks perfect and nice clicks too!
ReplyDeletewow..Nithya...you rock gal...lovely looking parottas..awesome clicks and description dear...:)
ReplyDeleteDr.Sameena@
http://www.myeasytocookrecipes.blogspot.com/
Superb & gorgeous parotas!!!! U have mastered the art of making the perfect parathas!!
ReplyDeletePrathima Rao
Prats Corner
too tempting dear
ReplyDeleteHats off to the Parotta Master. Looks so yumm... Sigh I would like a plate for the dinner.
ReplyDeleteparotta looks perfect and lovely clicks
ReplyDeleteSouth Indian Home
This is so lovely... adore ur step-by-step pics... I myself am a great fan of parottas and had been craving for it since I came to US. Why are we adding bread in here?
ReplyDeletehttp://krithiskitchen.blogspot.com
Awesome clicks and perfect parottas.
ReplyDeleteLovely step by step pics nits....perfect with chole masala...Yummy n tempting parotta with adorable decor...
ReplyDeleteSanyukta
http://creativesanyukta.blogspot.com/
wow....
ReplyDeletelooks gr8 dear.
adding bread sounds new to me...
love ur illustrated clicks :)
Fantastic step by step pics dear..too good!! I definately will be making this some day for sure..have tried the frozen ones when I was in swiss but never made them from scratch at home.
ReplyDeleteThanks for the response Nithya.. So quick!
ReplyDeletehttp://krithiskitchen.blogspot.com
Breakfast Club - Pancakes - Roundup
Wow perfect layered parottas..beautiful
ReplyDeleteWow! Awesome! I cannot roll out a nice soft roti and you can make parottas.
ReplyDeleteIts mind boggling how you did it with ease. I am too scared even to look at the pics.
Wowwwwiieeeee,really amazing .the step by step pics are so helpful and adding bread is new to me.
ReplyDeleteNithya, perfect parotta...adding bread is new to me...and beautiful clicks as always dear.
ReplyDeleteNithya, perfect parotta...adding bread is new to me...and beautiful clicks as always dear.
ReplyDeleteSuperb clicks as usual... perfectly done parottas... Thanks for the step by step instructions...
ReplyDeletetempting one dear.. I satisfy my craving with the forzen parottas which no where reach the fresh made ones..
ReplyDeleteI too make the same way. but it is not so soft as we get in hotels. will try adding bread nd milk. nice , useful post :)
ReplyDeleteLovely parotta... nice step by step presentation.. amazing pics
ReplyDeleteI almost make it the same way but adding bread is great. lovely pictorial Nithya.
ReplyDeletePeriyamma makes them exactly the same way and her tips was to use the bread and sugar too. I was making them ever since but now opt for the frozen ones.
ReplyDeleteWow Paratha looks just perfect. Love the step by step demo with pictures.. Nice presentation..
ReplyDeleteBookmarking this one
ReplyDeletei can't tell you how much of thoughts you have pulled in brain seeing your parotta! looks wonderful, i would being on with some egg kurma..i don't think i can never those raw parotta's flying in air :) thanks for ur words means a lot to me!
ReplyDeleteFlaky parottas looks incredible,never tried adding bread, cant wait to try..
ReplyDeleteThat is such a great looking pics and preparation. Love this process.
ReplyDeleteI have grown up near a Parotta shop eating Parotta all along my life. I have always been observing how the parotta master does his dough.
ReplyDeleteAdding bread to the parotta dough is not correct and the end product is not going to be like real parotta, its going to be like a biscuit.
Real Parotta's texture has to be chewy, layered and it will not look like chappathi.
People might say adding bread is this version and that version, but when talking about authenticity this is not authentic.
I had commented about the Parotta and Unfortunately my name is not appearing. I am Siva Karthik.
ReplyDeleteDon't compare this parotta with a road side shop.
Cheers,
Siva Karthik
delicious
ReplyDeletehaven't added bread before looks wonderful
Hey Nithi looks super Yummy and u know it was in my to do list too :).. great job. But I don't add bread to the dough. Love all the pictures.
ReplyDeleteThanks all :)
ReplyDelete@Siva Karthik - Thank you so much for sharing your views. But I would request you to give it a try this way and then let me know if it isn't chewy or if it is like a biscuit. I have had barotta from the road side stall and have also had mine and find them pretty much similar. The yeast in the bread only makes the barotta soft and flaky. I haven't claimed it to be absolutely the road side version, but its pretty close to it and I guarantee that it tastes really good. Trust me and give it a try. I would be happy to see you come back after trying it.
Wow Perfect Parotta nithi,love the step vise clicks...too gud.
ReplyDeletesuper like! nothing to beat the good old puuraaataa ;-)
ReplyDeletewow lovely and tempting pictures ...... looks delicious .........
ReplyDeletePictures are so lovely Nithi..great efforts!
ReplyDeleteParottas look flaky and yum!
ReplyDeletewww.appetitetreats.com
wow Nithya, awesome job!!I love parottas and thats something i miss here all the time..Great job!
ReplyDeleteWow Nithya!! this sure looks yummy. Have always admired people making parotta. And felt it impossible to make.But the method you have shown is so good and possible. Thanks dear for the step by step illustrations.
ReplyDeleteLovely pictures esp. the third one.
ReplyDeletewhat an incredible looking flaky parota, super perfect, but adding bread is definitely new loved your clicks
ReplyDeleteevent hosting : summer coolers
me and my sister makes this,but i never tried this later (after marriage)
ReplyDeleteAdding bread is very new to me.wonderful post
parotta looks gr8.
ReplyDeleteHi Nithya,
ReplyDeleteAdd more oil (min 5 tablespoons) when kneading the dough and make the dough loose, it should not be solid like the dough used for making poori. You can just roll it out flat, then crumble it back into a ball, beat it a few times flat and then roll it flat again. That would make it more like the parotta of roadside shops.
But yours is a novel idea that would work out for most people than the original recipe.
Hi Nithya, first time visitor to your blog. Lovely pictures and lovelier recipes ! You make it look so easy :)
ReplyDeleteHey Nithi ,
ReplyDeleteTried ur barotta recipe and it was almost perfect .. probably I dint get the layers perfectly because
1) I dint let the dough stand for min 2 hrs .. me avasara kudukkai cudnt wait and started making in half an hour
2) I dint smear oil after spreading and before making fan .. I understand that is the important step which makes the layer stand out .. anyways I did that on the last one and got the layers puffed up hee hee..
3) I was very stingy to use the oil
Inspite of all this , I got better barottas and it tasted and looked much much better than the frozen ones which I normally get .. We both of us thoroughly enjoyed it and my Husband said you will not get better parottas than this for a scrimpy person like me .. Thanks a ton for sharing the recipe .. Next time I make , I for sure send you the pic :) ..
wow! wow! that's a great...no perfect looking parotta u have made...
ReplyDeleteThis comment has been removed by the author.
ReplyDeleteHi Nitya,
ReplyDeleteParotta looks beautiful! What are the odds of using whole wheat flour instead of maida? Will it become biscuit-y?
Thanks!
Reshma
can we add yeast while making dough? In my opinion , while we make bread the yeast is already dead due to high heat in oven. How it will act after wards? My parotta always comes like biscuits. I will try adding bread now. Thanks.
ReplyDeleteI made 6 parottas with reduced ingradiants in proportion but they didnot come as per road side parottas. I mean they looked like parottas but were not chewy. Addition of bread slice had no effect. How to make parottas that are chewy? Any body has ideas? Pls share.
ReplyDeleteknow what is real parooto in this site,.................
ReplyDeletehttp://stylepandi.blogspot.in/2012/03/blog-post_31.html
Yesterday my wife made it,really good ,my childrens tasted truely, but in my point of view I had experianced in road side which is different.
ReplyDeletewow! Those look so good! Have tried making it several times at home but am not yet satisfied with my attempts, must give your version a try!
ReplyDelete